How to Create & Use Your Skool Account in 2025: Complete Step-by-Step Guide

Welcome to this comprehensive tutorial on how to create and manage a Skool Account—your gateway to building engaged online communities and courses with ease. This guide will walk you through everything from setting up your community, creating posts, managing classrooms, and unlocking powerful features within Skool.com, the all-in-one platform designed to empower creators, educators, and entrepreneurs.
Whether you are new to Skool or looking to maximize your experience in 2025, this step-by-step article covers all the essentials you need to know. By the end of this guide, you will have a clear understanding of how to leverage your Skool Account to build interactive learning environments, monetize your content, and foster vibrant communities.
If you’re ready to get started, keep reading and follow along as we break down each feature and show you how to bring your community to life!
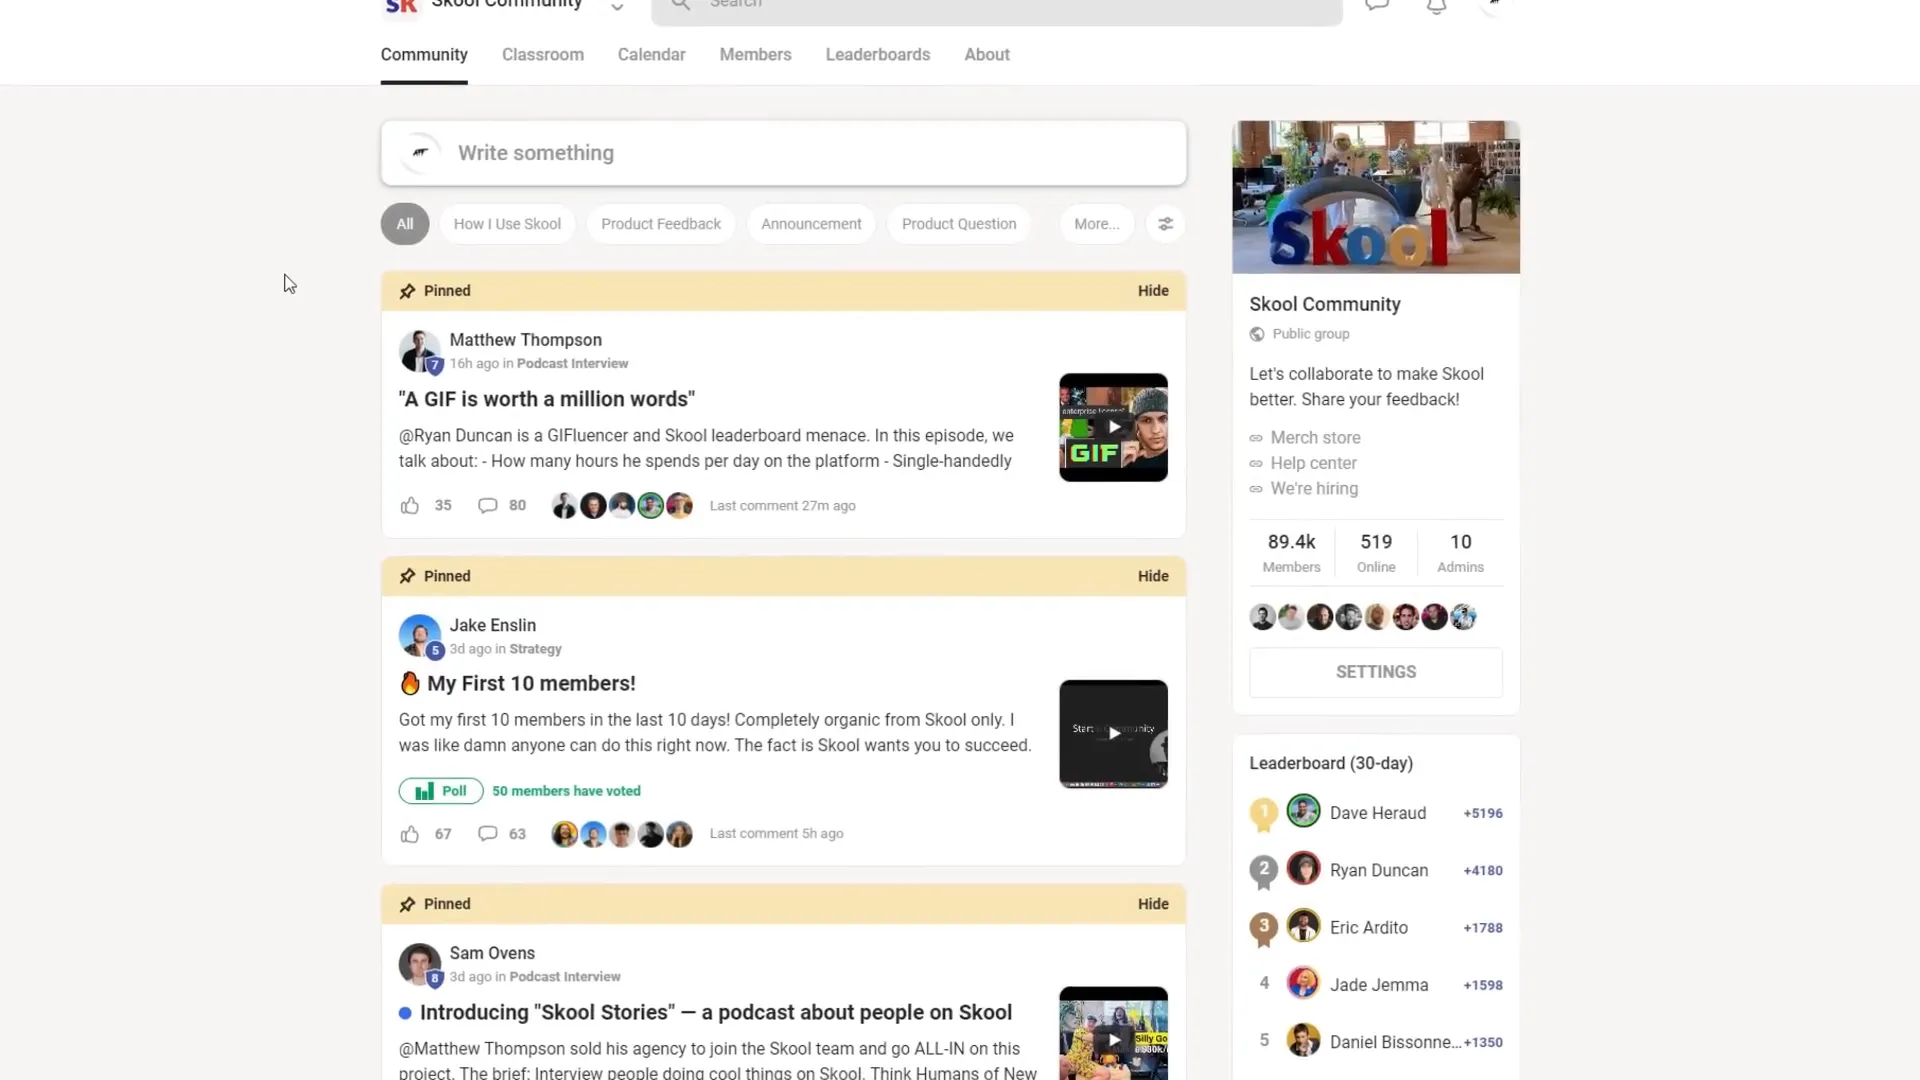
Table of Contents
- Step 1: Exploring the Skool Dashboard and Community Tab
- Step 2: Navigating the Classroom Tab – Organizing Your Courses
- Step 3: Creating Your Own Skool Community
- Step 4: Setting Up Your Community’s Identity
- Step 5: Monetizing Your Skool Community
- Step 6: Managing Categories and Community Organization
- Step 7: Unlocking Chat and Reducing Spam with Levels
- Step 8: Tracking Community Metrics and Engagement
- Step 9: Implementing Gamification with Levels
- Step 10: Adding Useful Links for Your Community
- Step 11: Creating and Managing Courses in the Classroom Area
- Step 12: Adding Modules and Content to Your Courses
- Step 13: Using the Calendar to Schedule Events
- Step 14: Managing Members and Invitations
- Step 15: Viewing Leaderboards and About Section
- Additional Tips and Features
- Frequently Asked Questions (FAQ)
- Conclusion
Step 1: Exploring the Skool Dashboard and Community Tab
Once you log into your Skool Account, the dashboard is your central hub. Let’s begin by exploring the main tabs you will use daily. The first and most interactive area is the Community Tab.
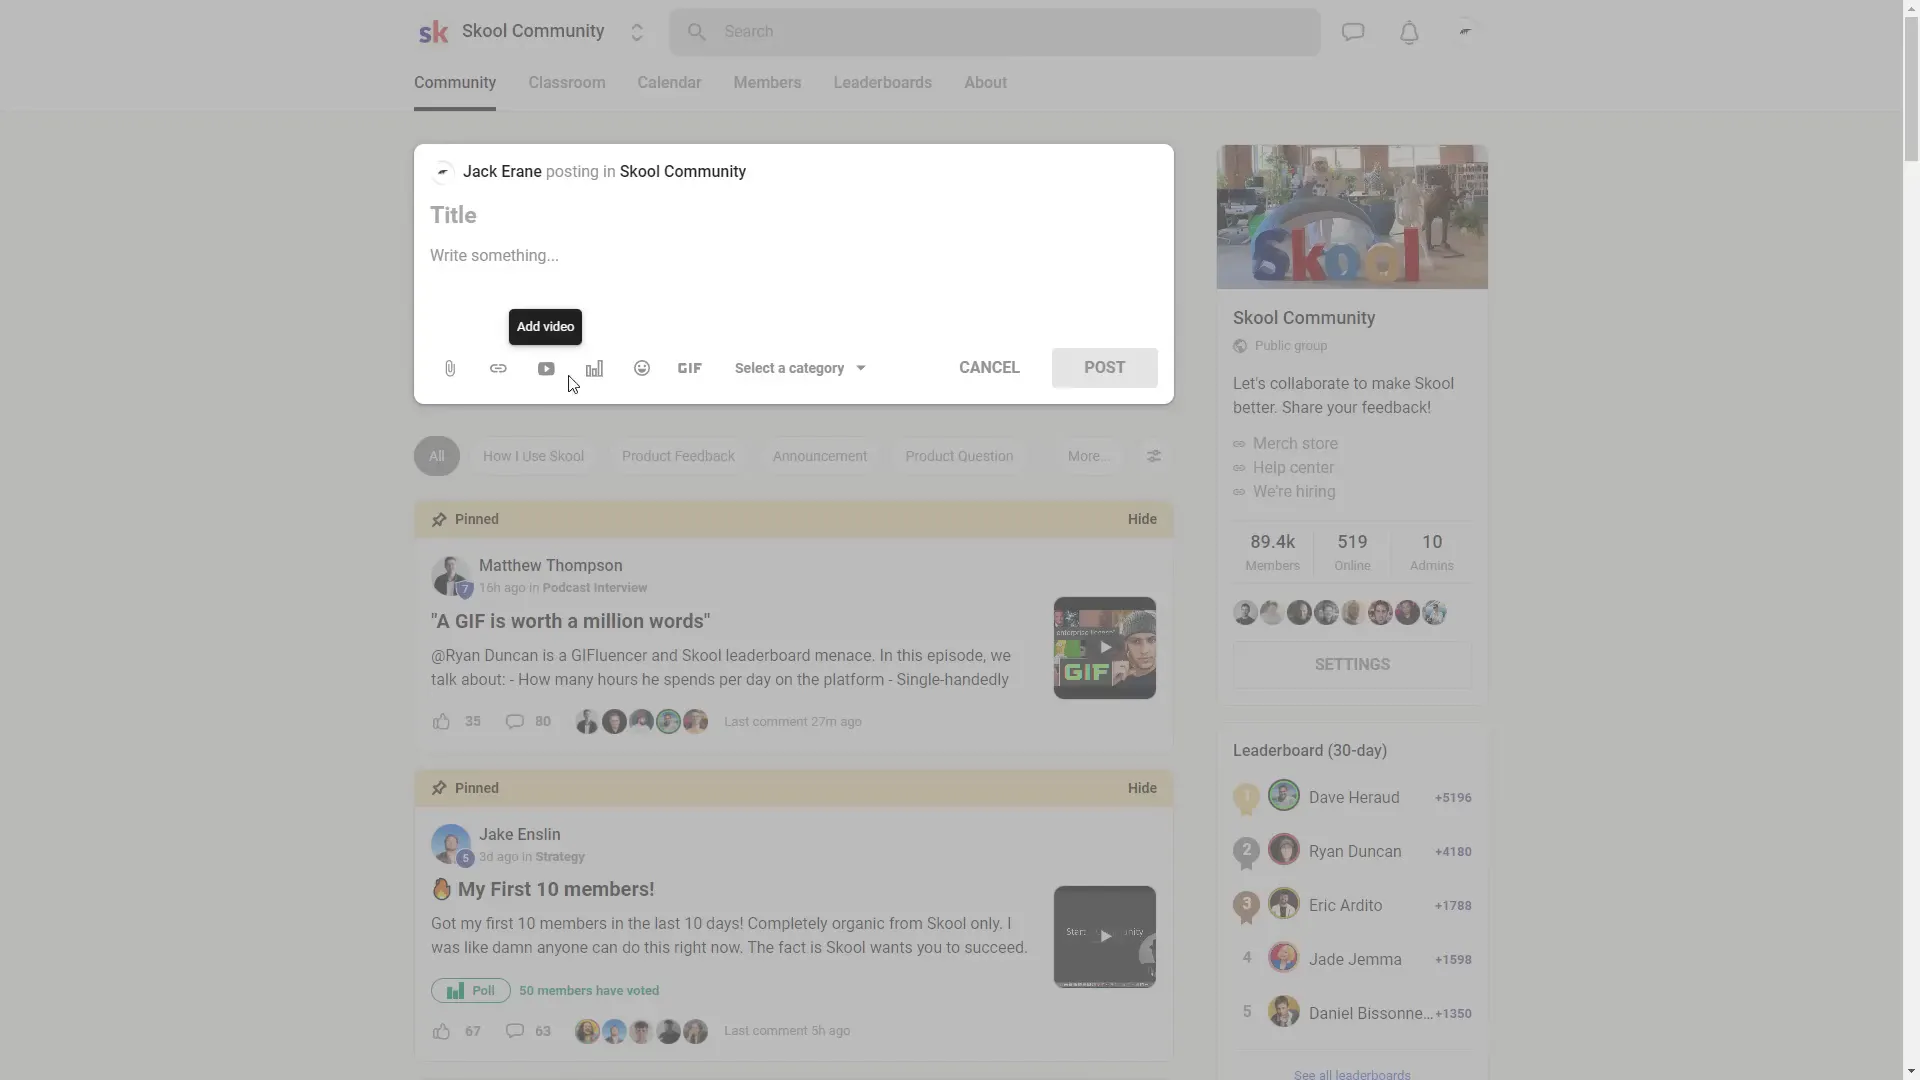
Within this tab, members of your community can create and interact with posts. To create a post, click on “Write something here.” You will be prompted to add a title and compose your message. But Skool goes beyond simple text:
- Add attachments such as files or PDFs
- Insert links to external resources
- Embed videos directly in posts
- Create polls to engage your audience
- Use emojis and GIFs to make your posts lively
- Assign posts to specific categories for better organization
One of the great things about Skool is the existing posts from community members that you can browse, comment on, or reply to. This fosters active engagement and helps build a vibrant space for discussion.
For example, clicking on a post will reveal the comments section at the bottom, where you can add your thoughts or feedback. On the right side of the screen, you’ll often see the community’s logo, a description, and useful links such as a merch store, help center, or hiring page if the community owner has set these up.
Additionally, you can filter posts by category to find discussions relevant to your interests or to keep the community organized. Categories improve navigation and ensure conversations stay on topic.
Step 2: Navigating the Classroom Tab – Organizing Your Courses
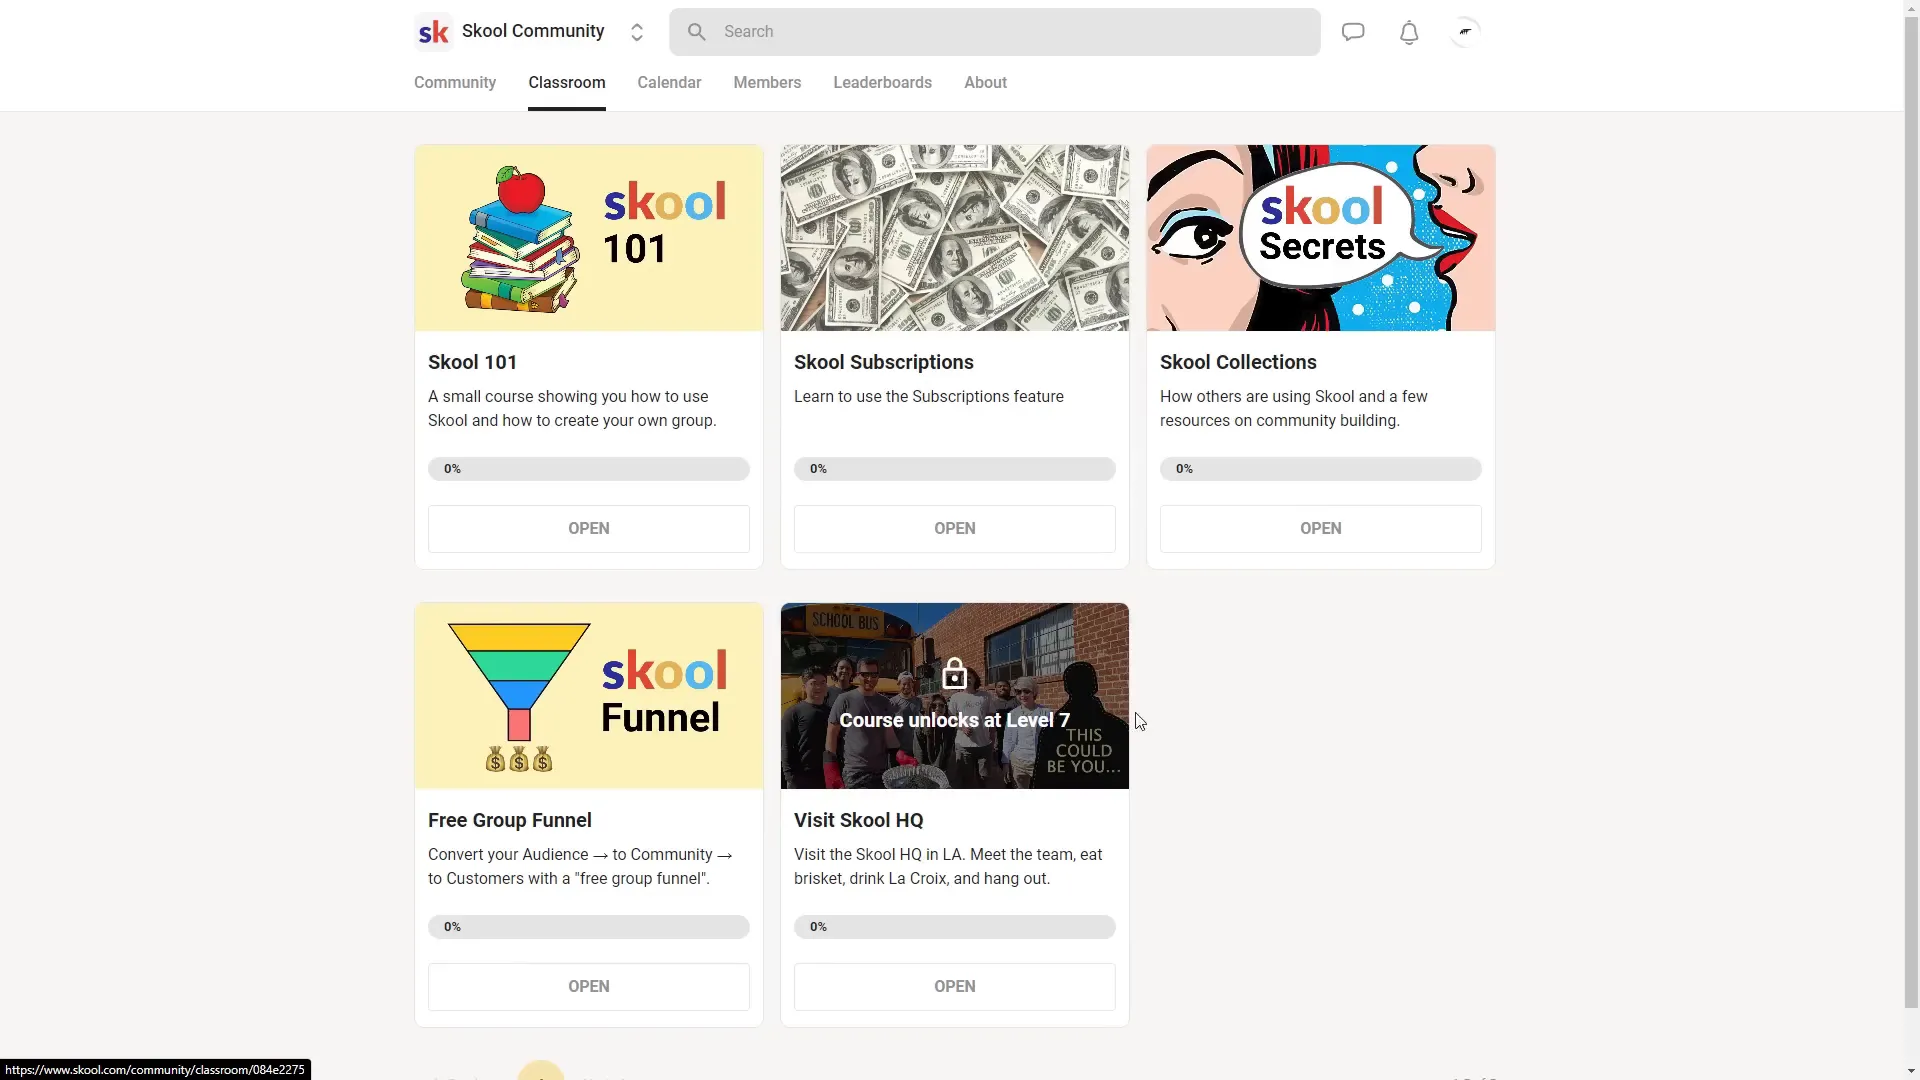
The next critical area in your Skool Account dashboard is the Classrooms Tab. This is where you can organize and showcase your courses or educational content.
Within classrooms, you can create multiple courses. For example, there may be courses explaining how to use Skool or detailing subscription plans and payment setups. But you can create courses on any topic you want to teach or share.
The classroom tab acts like a digital course catalog, providing a clean and professional space to display your educational materials, video lessons, documents, and interactive content.
Step 3: Creating Your Own Skool Community
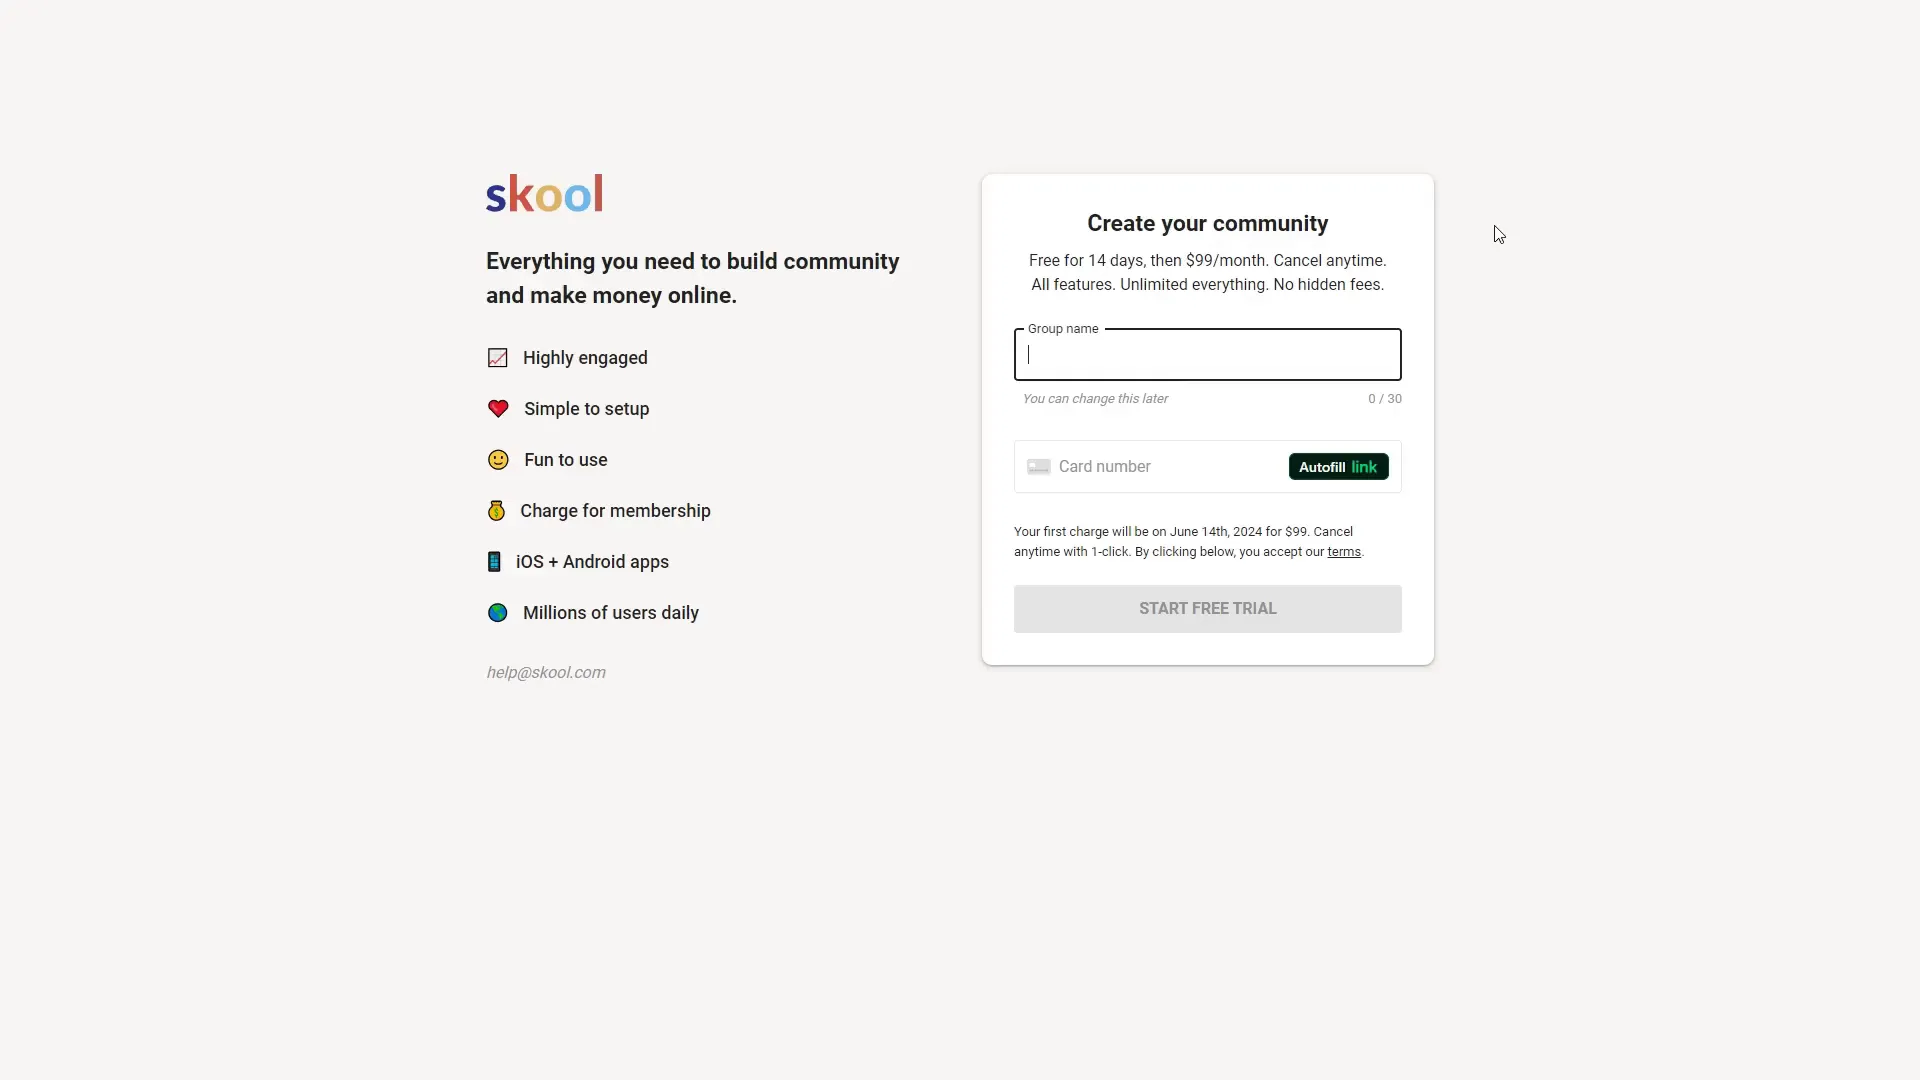
Now that you understand the basic layout, let’s dive into creating your own community within your Skool Account. This is where your journey as a creator or educator truly begins.
- At the top of your dashboard, click the arrow button next to your profile or community selector.
- Select Create a Community.
- Give your community a unique name that reflects your brand or topic.
- Enter your payment card details to start your free trial. (Using the special link can give you a 14-day free trial.)
- Click Start Free Trial to launch your community.
During the 14-day trial, you can explore all features without commitment. Afterward, Skool charges $99 per month, but you can cancel anytime without hidden fees.
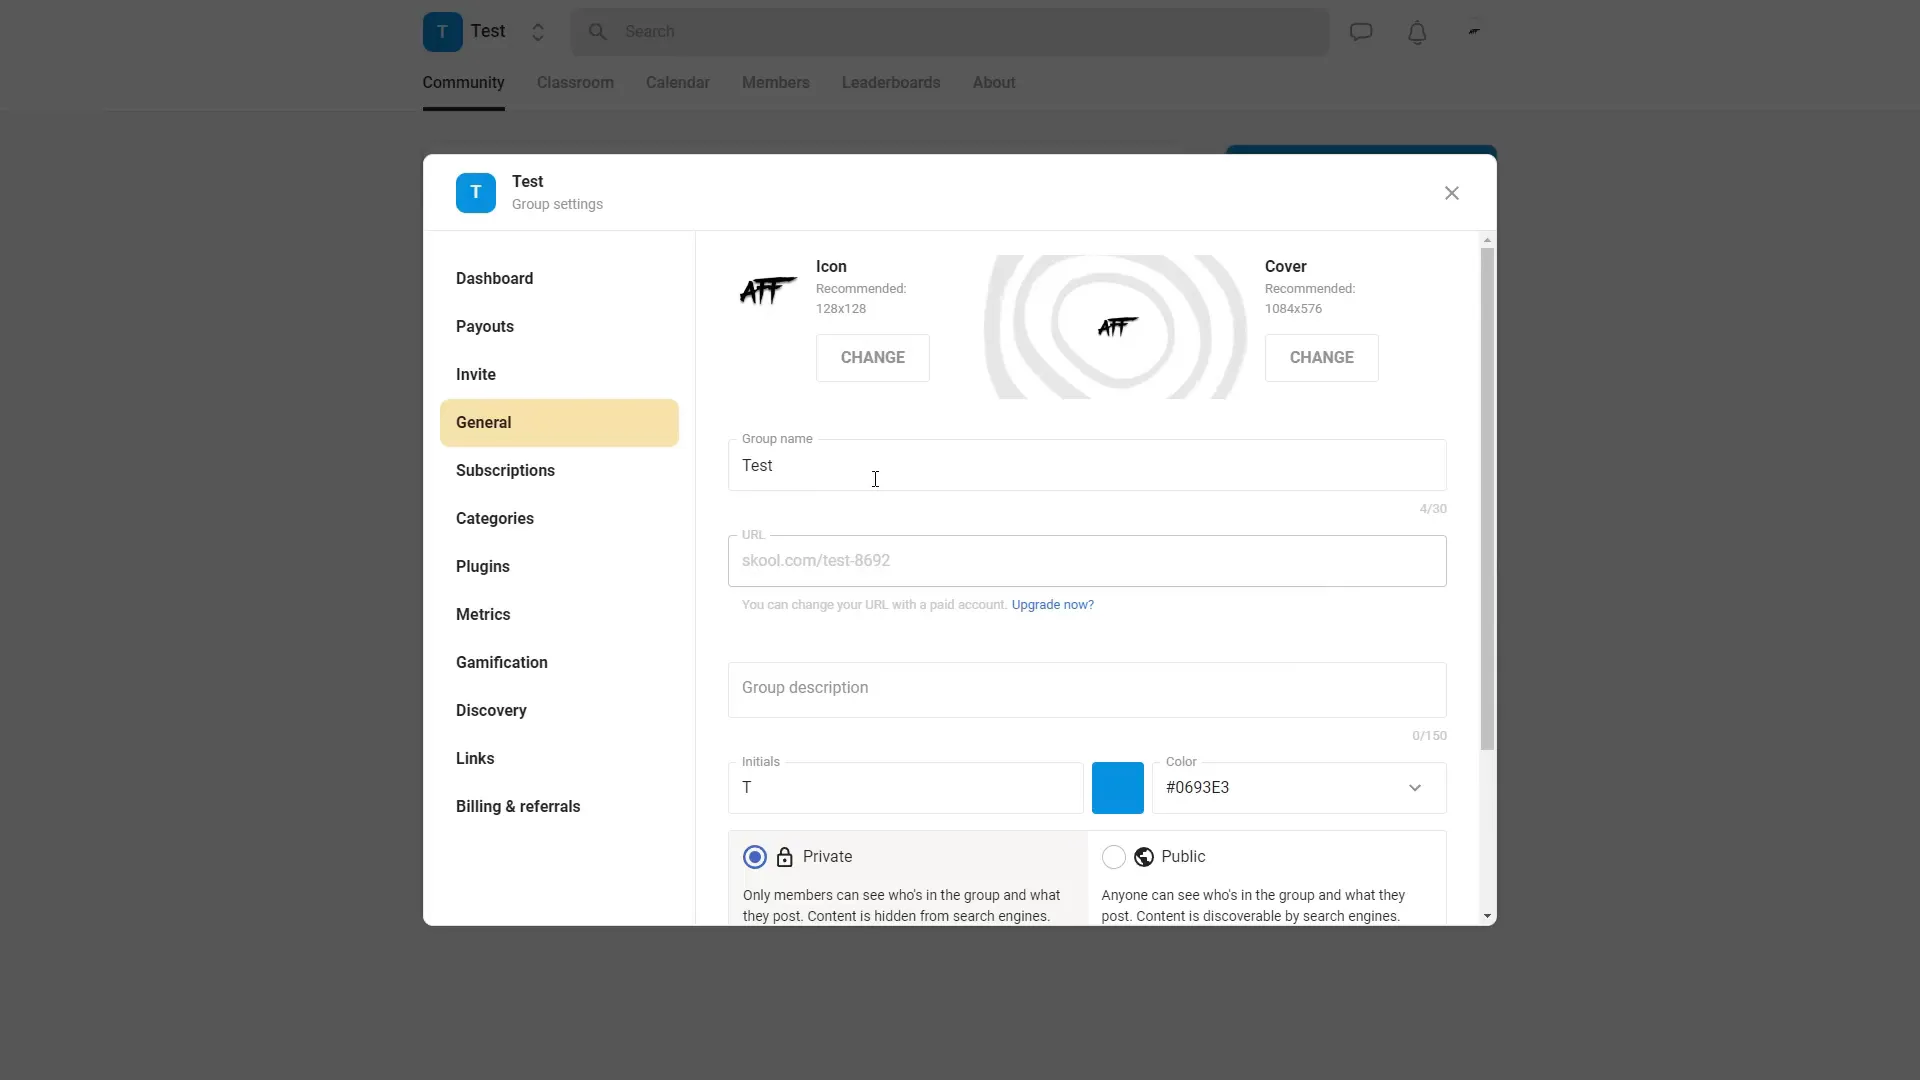
Step 4: Setting Up Your Community’s Identity
Once your community is created, you’ll want to personalize it to make it welcoming and professional. Here’s how:
- Click the Settings option in your community dashboard.
- Upload a community icon or logo to represent your brand.
- Set a cover image for the community header to visually attract members.
- Modify your community name if desired.
- Add a detailed and engaging community description.
- Choose your community’s privacy settings: Private means only approved members can see content, while Public allows anyone to view and participate.
- Add your initials and select a color if you don’t have a logo.
Once you’re happy with these changes, click Update Settings to save them. Your community will now display your branding and description prominently for members to see.
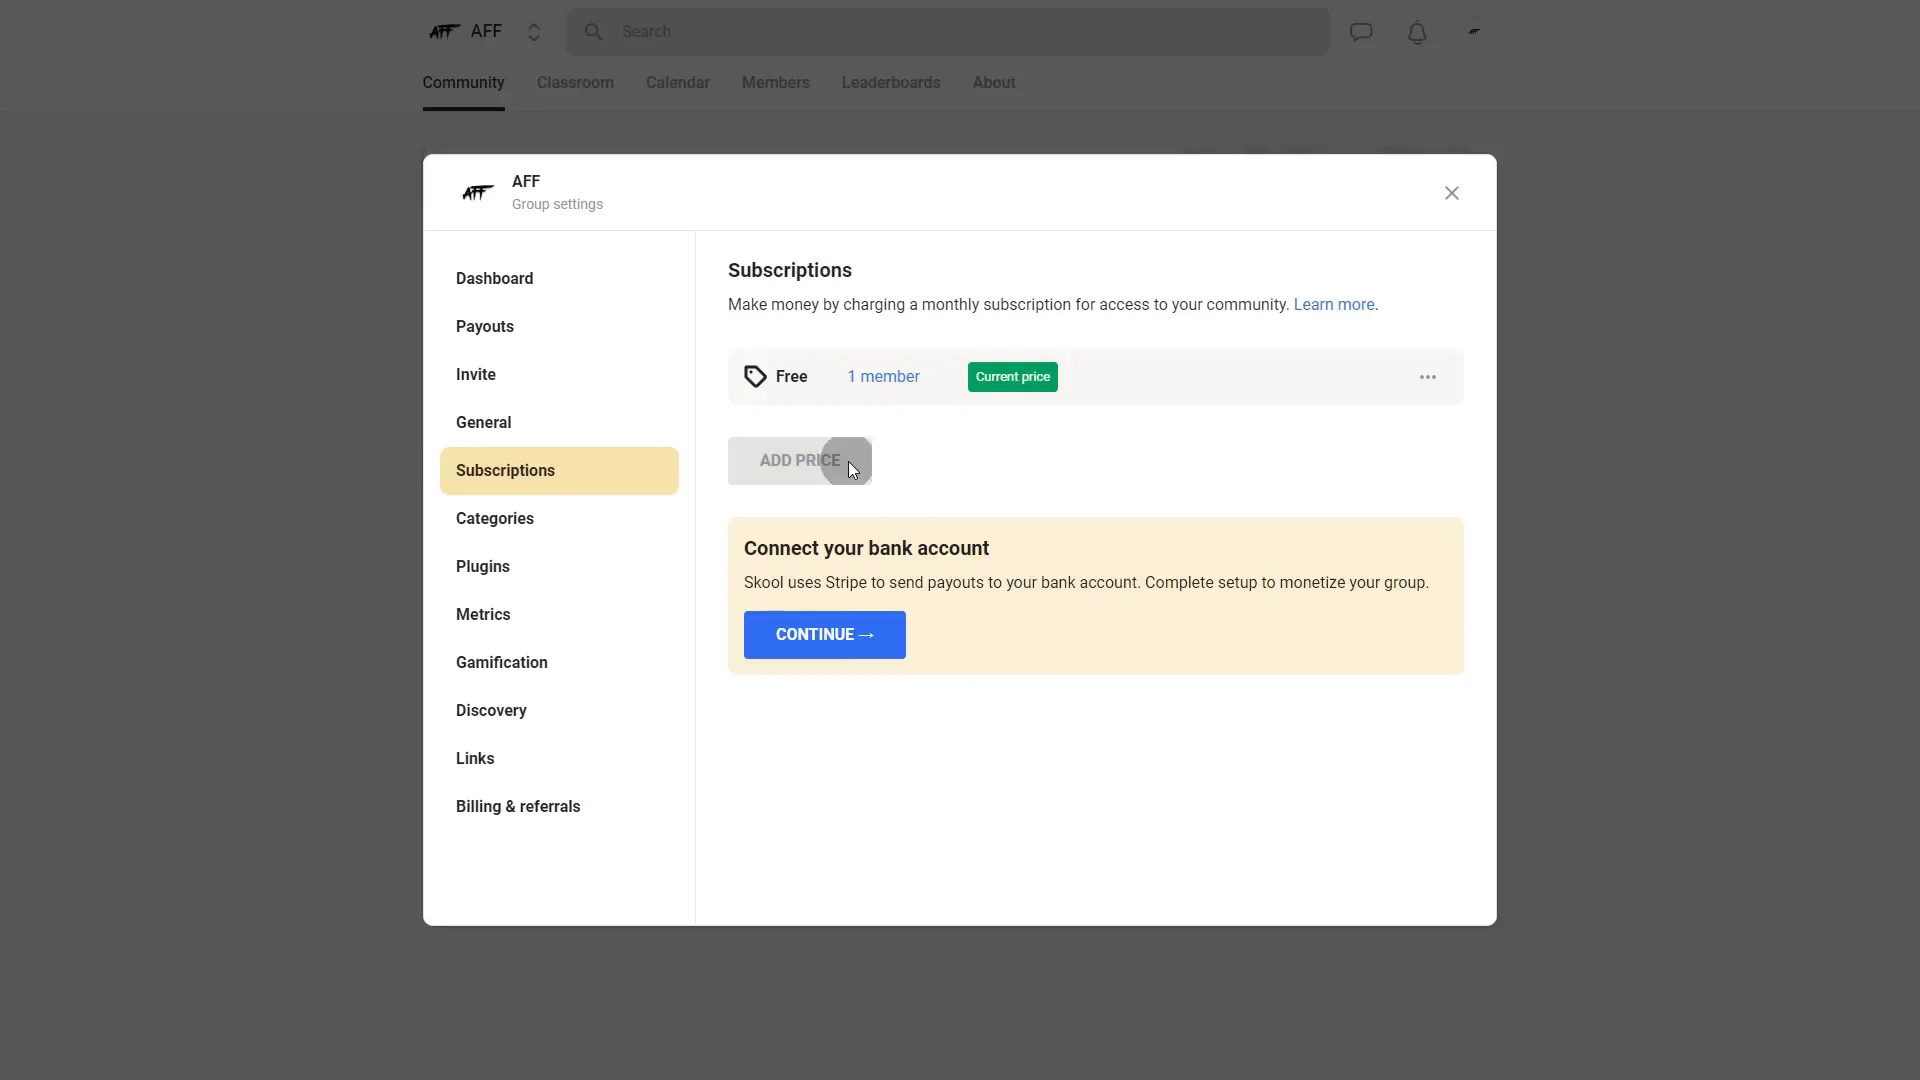
Step 5: Monetizing Your Skool Community
A standout feature of your Skool Account is the ability to monetize your community. You can charge members for access, turning your expertise or content into a revenue stream.
Here’s how to add a price to your community:
- Go to your community dashboard.
- Click Add Price.
- Connect your bank account by following the on-screen prompts.
- Set a monthly subscription price for access to your community.
Once set, new members will pay this price to join, while existing members can continue enjoying your content. This seamless integration makes managing payments straightforward and transparent.
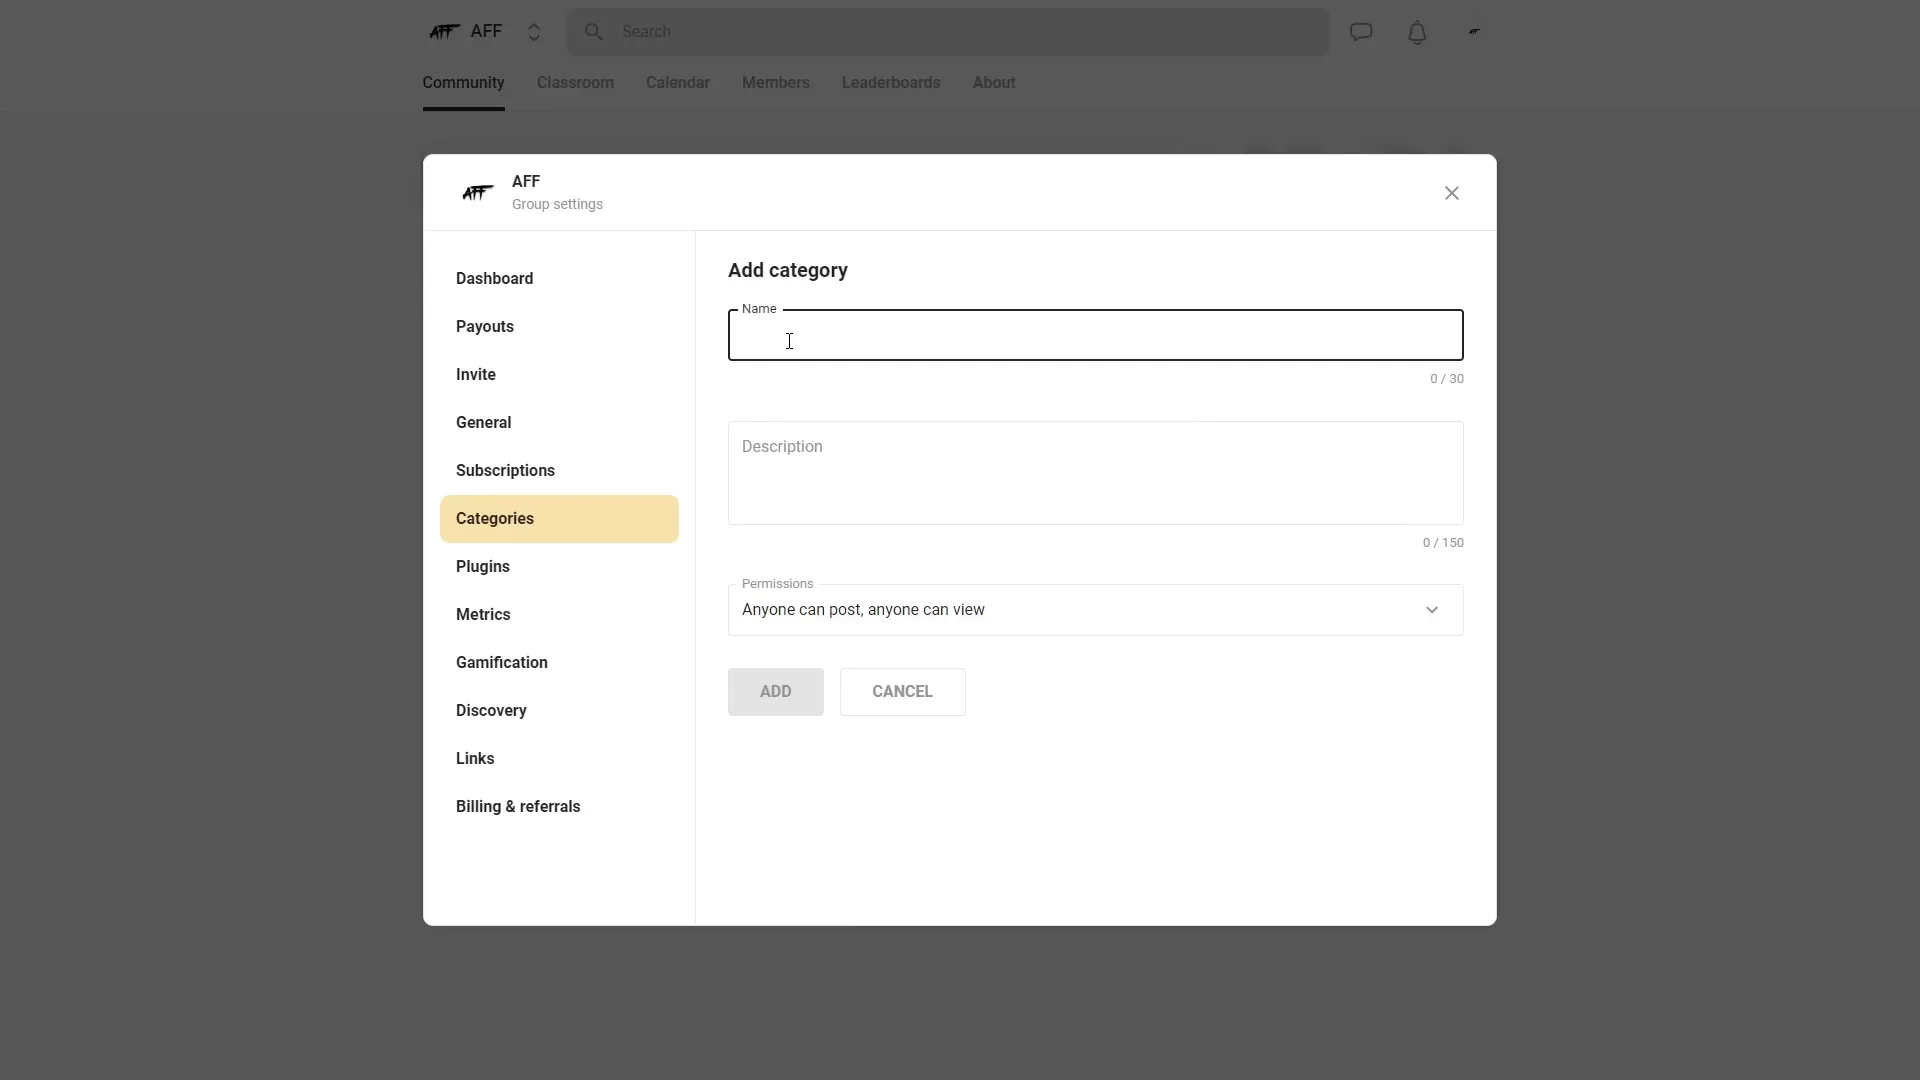
Step 6: Managing Categories and Community Organization
Categories help keep your community organized and discussions relevant. By default, Skool provides a “General Discussion” category, but you can customize this to suit your needs.
To add or edit categories:
- Navigate to your community dashboard.
- Delete default categories if you want to replace them.
- Add new categories such as “Feedback,” “Announcements,” or any topic relevant to your community.
- Provide a description for each category to guide members.
- Set permissions on who can view or post in each category (e.g., everyone or only admins and moderators).
- Click Add to save the new category.
This category system helps your community stay focused and ensures members can easily find the content most relevant to them.
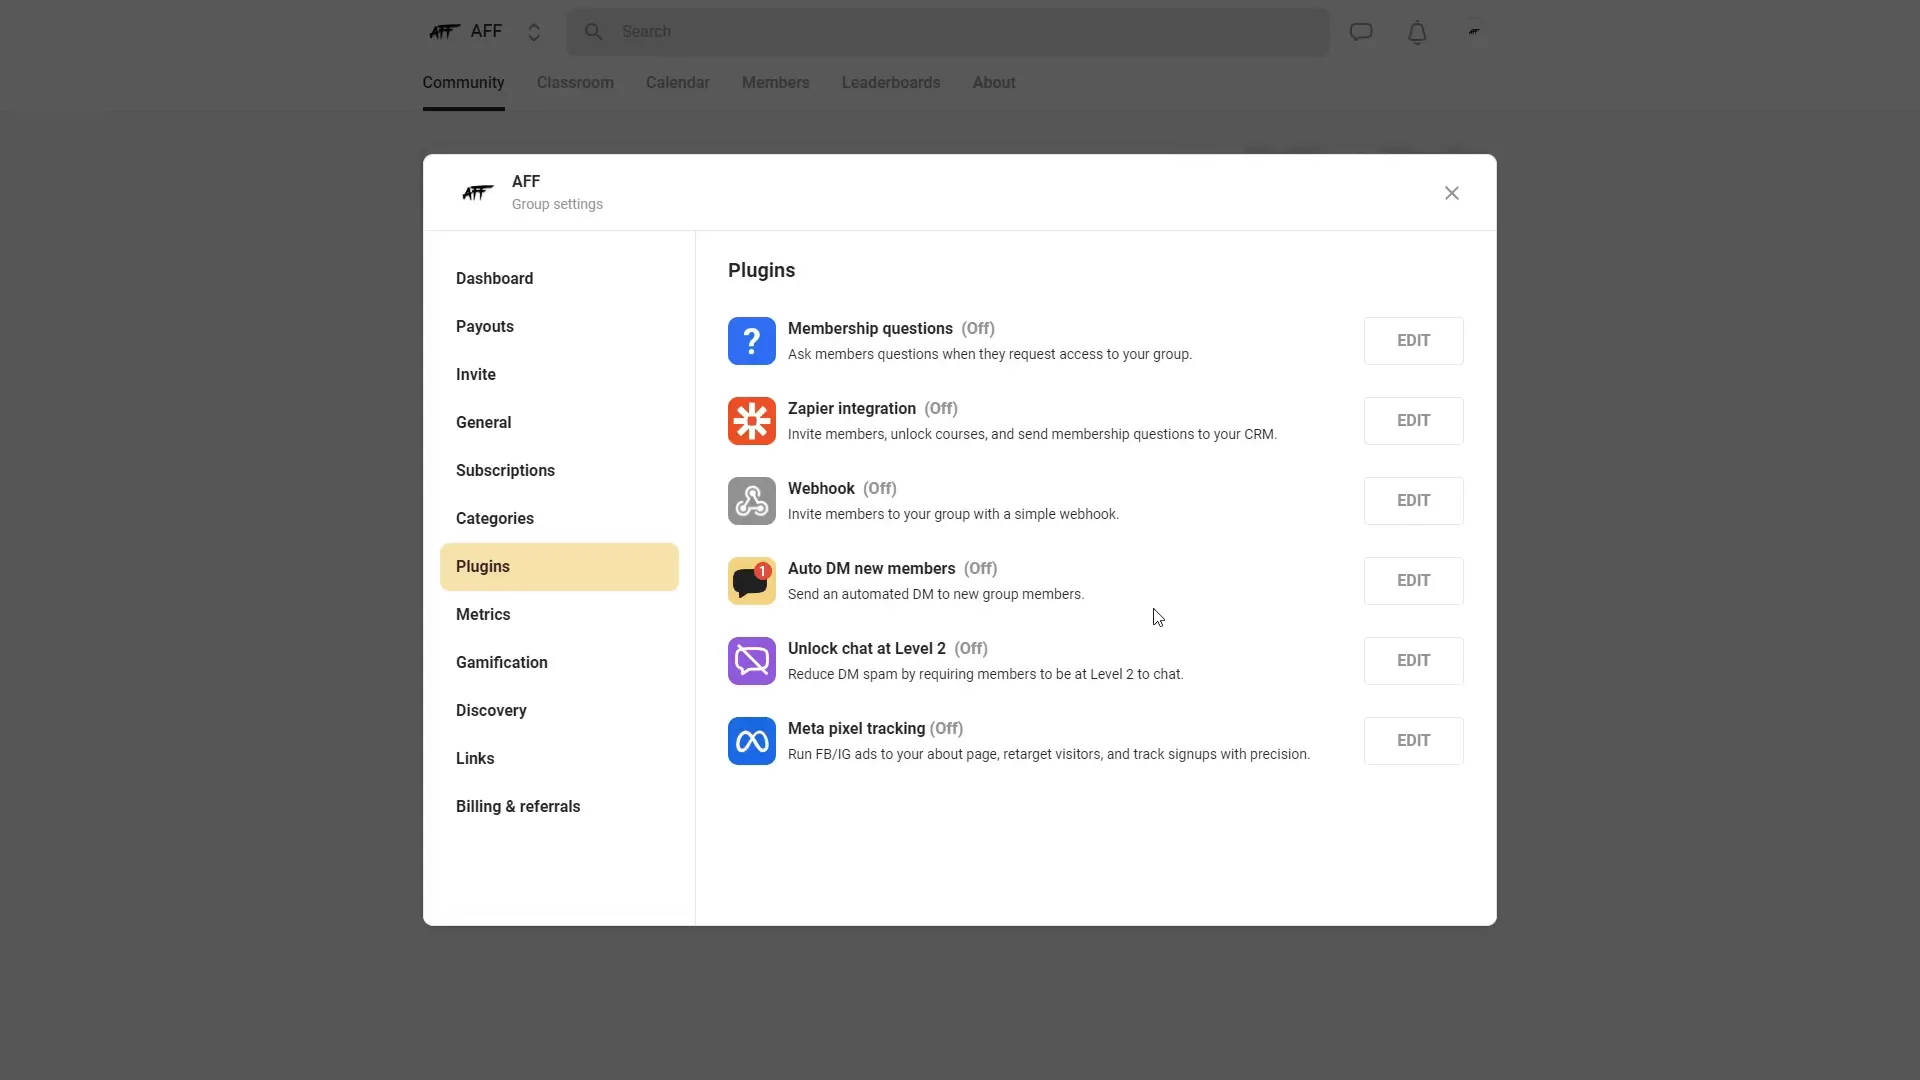
Step 7: Unlocking Chat and Reducing Spam with Levels
Skool incorporates gamification elements to enhance member engagement and maintain quality discussions. One such feature is the chat functionality, which is unlocked only after members reach Level 2.
This system prevents spam by encouraging members to contribute meaningfully before gaining full chat access. Here’s how it works:
- Members start at Level 1 upon joining.
- By participating and contributing posts or comments, they earn points or progress to Level 2.
- Reaching Level 2 unlocks chat privileges, allowing them to communicate in real-time.
This approach ensures your community remains active but free from spammy or irrelevant chatter.
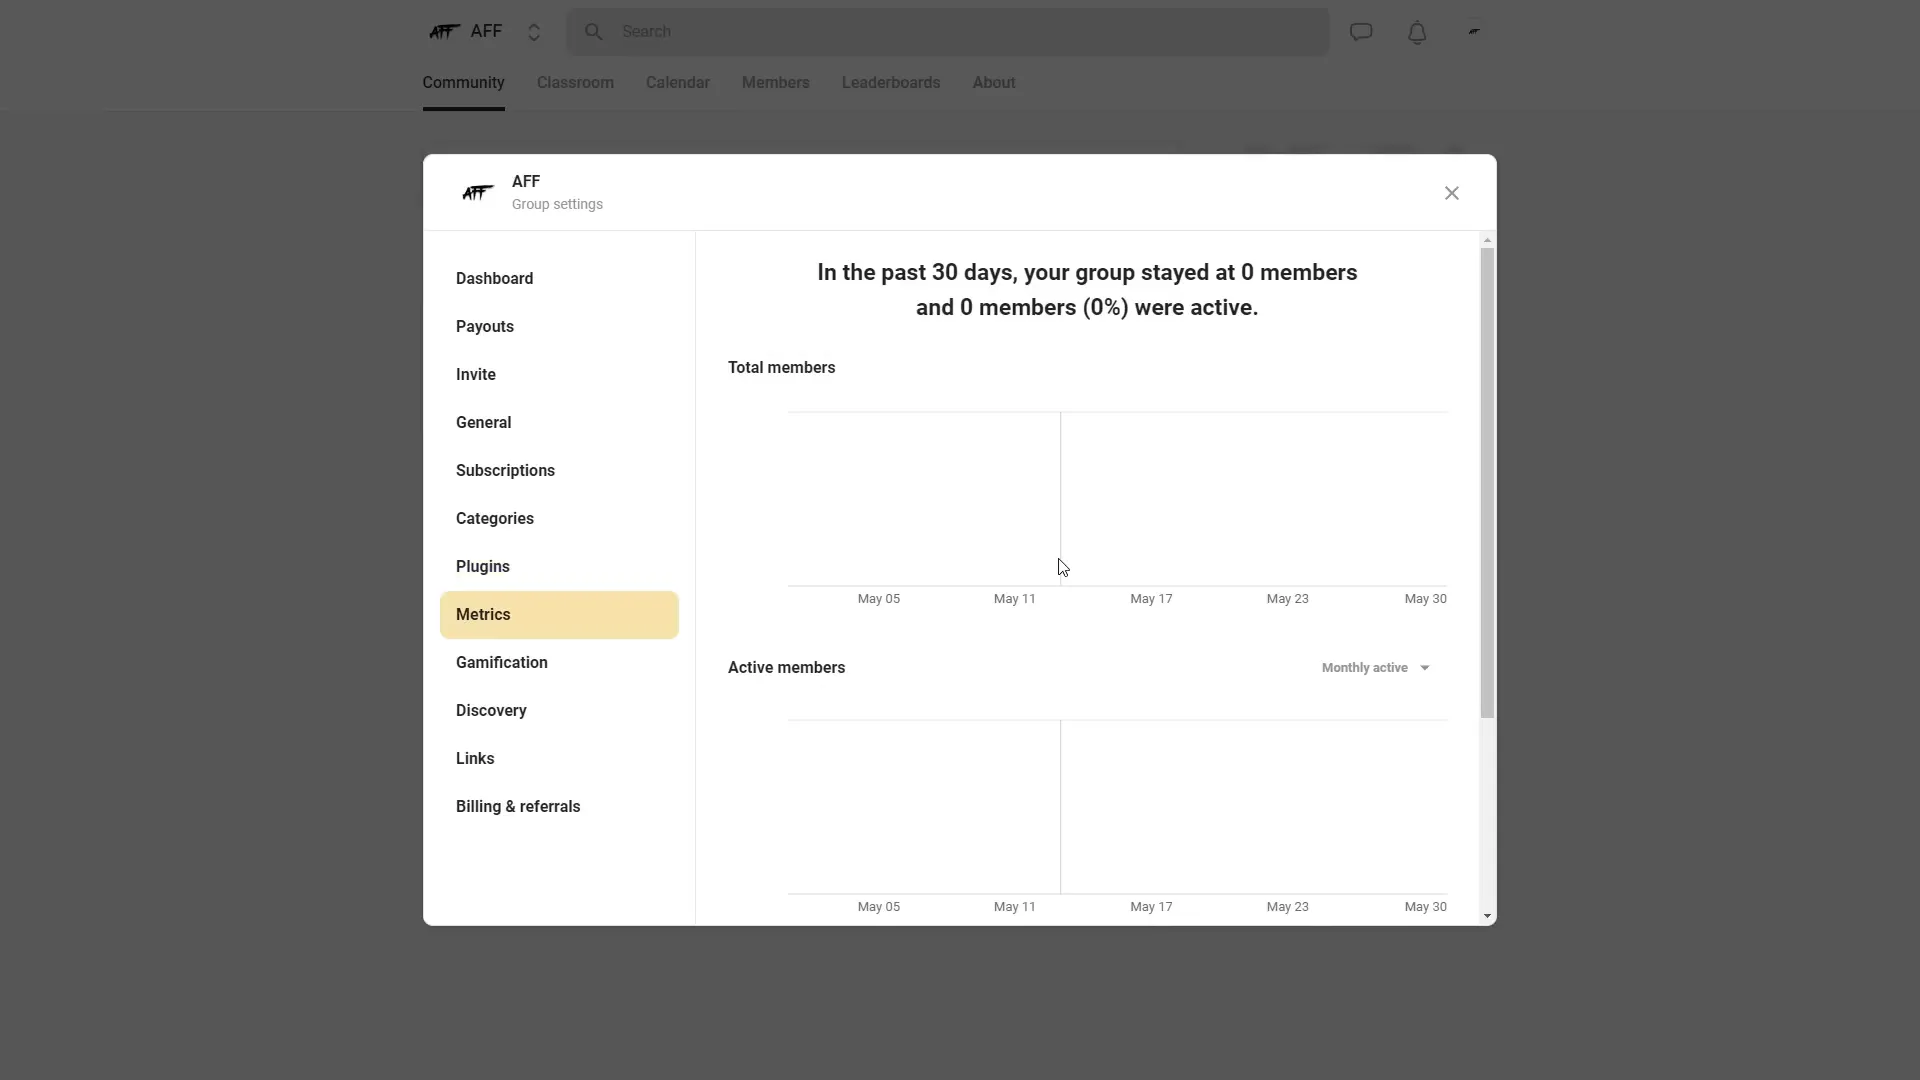
Step 8: Tracking Community Metrics and Engagement
Keeping an eye on your community’s health is crucial. Skool provides a Metrics Tab that displays important data such as:
- Total number of members
- Active members count
- Daily, weekly, or monthly activity stats
These insights help you understand how engaged your community is and identify trends or periods of growth and decline. You can customize the time frame for activity reports, allowing you to analyze data in a way that best fits your goals.
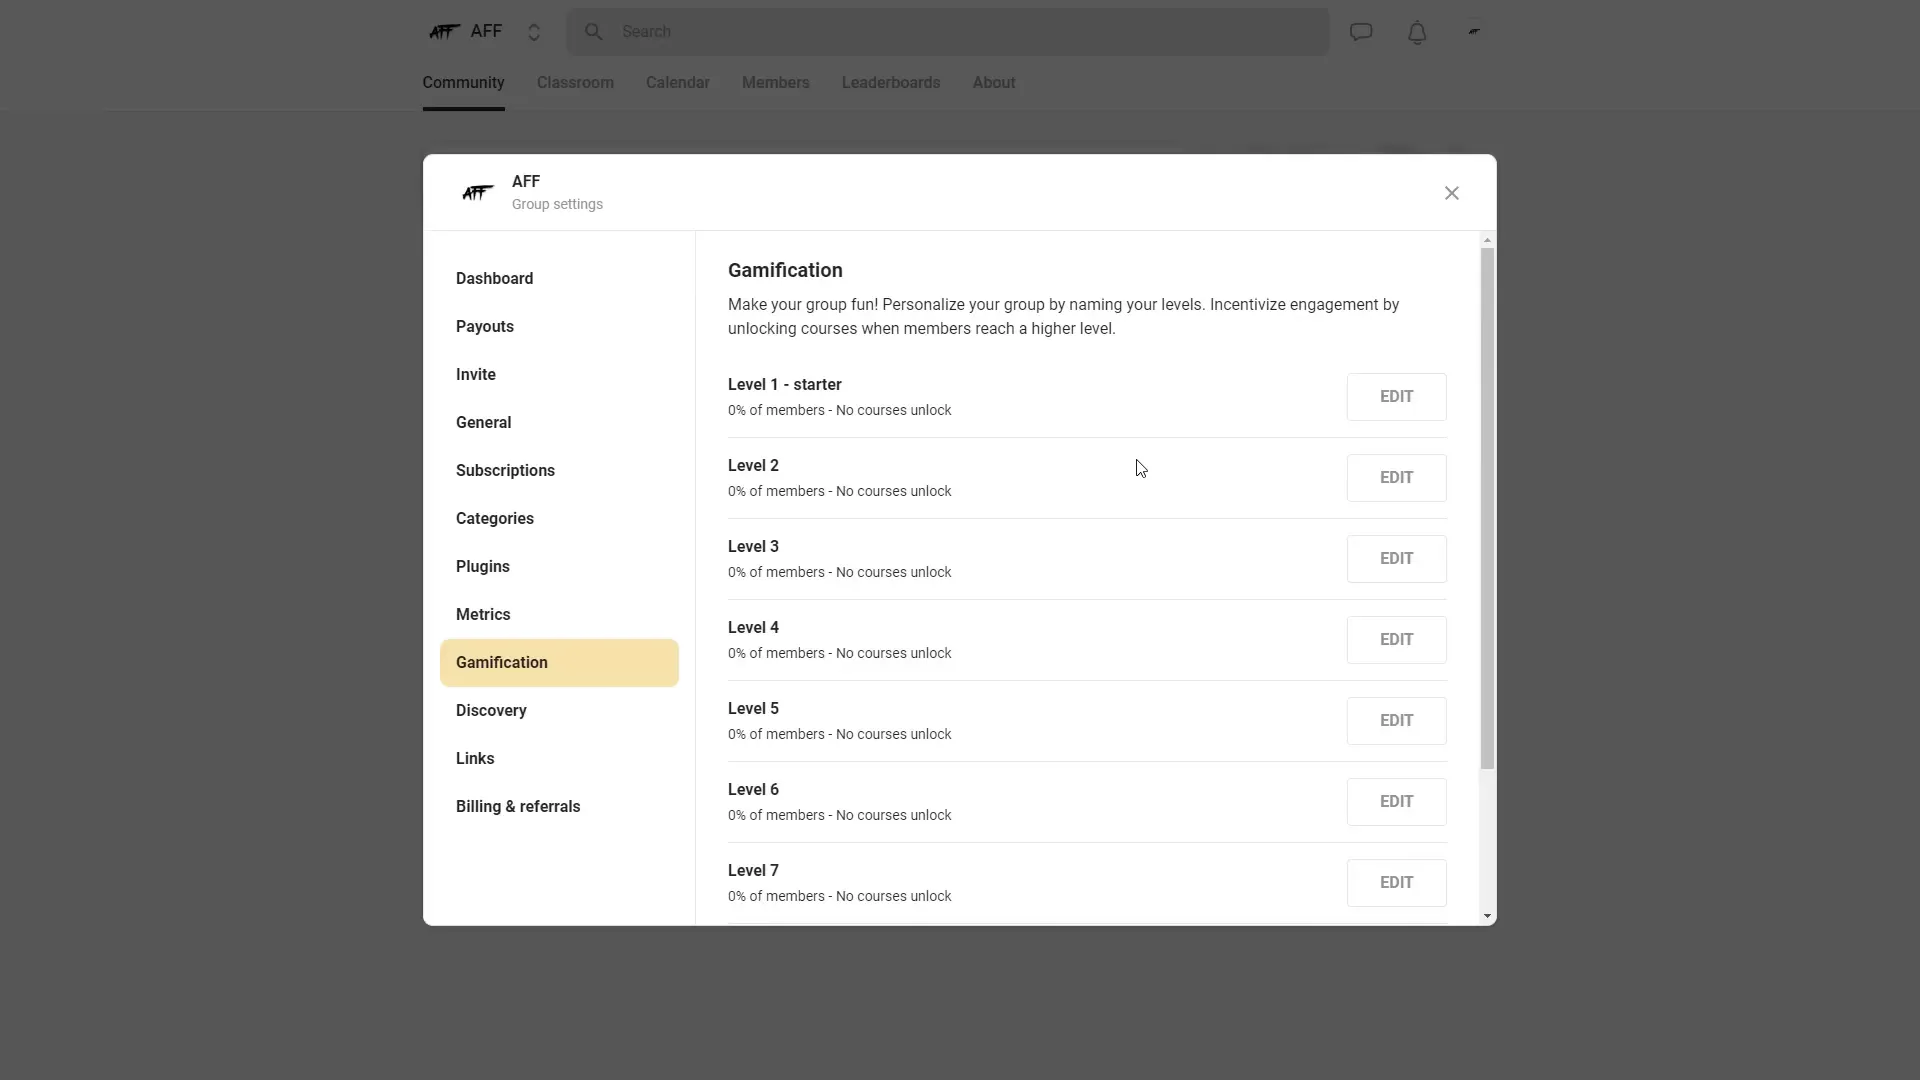
Step 9: Implementing Gamification with Levels
Gamification is a powerful motivator in online communities. Skool lets you create custom levels and assign names to them, encouraging members to participate actively and unlock new perks.
To set up levels:
- Go to the Gamification Tab in your community dashboard.
- Create levels and assign them descriptive names, such as “Starter” for Level 1.
- Save your levels.
- Assign permissions or unlocks tied to these levels (e.g., access to exclusive courses or content).
This system creates an incentive for members to engage more deeply with your community, making the experience rewarding and dynamic.
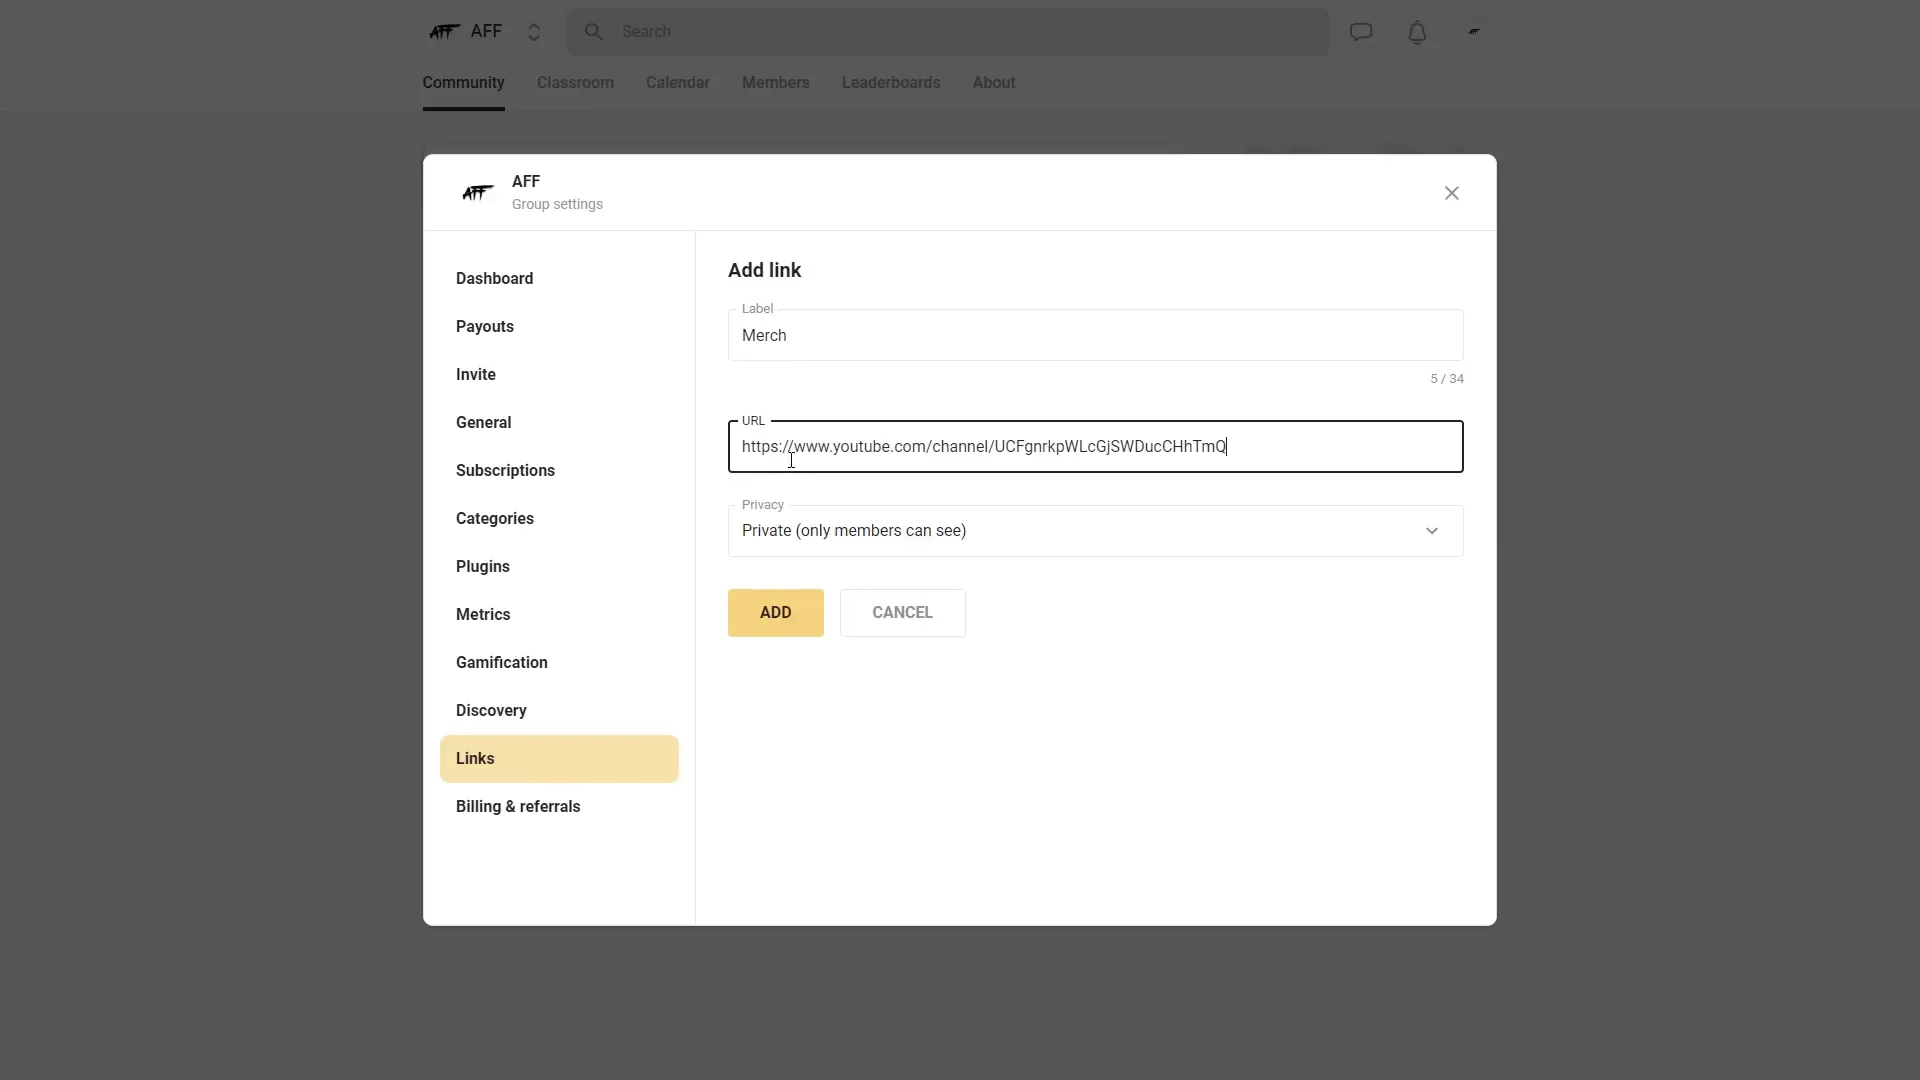
Step 10: Adding Useful Links for Your Community
To make navigation easier and provide quick access to important resources, you can add custom links to your community dashboard. These might include your merch store, social media pages, or external websites.
To add a link:
- Go to the Links Area in your community dashboard.
- Click Add Link.
- Label the link (e.g., “Merch Page”).
- Enter the URL you want to share.
- Choose whether the link is public or private.
- Click Add to save.
These links appear prominently in your community, making it easy for members to find additional resources.
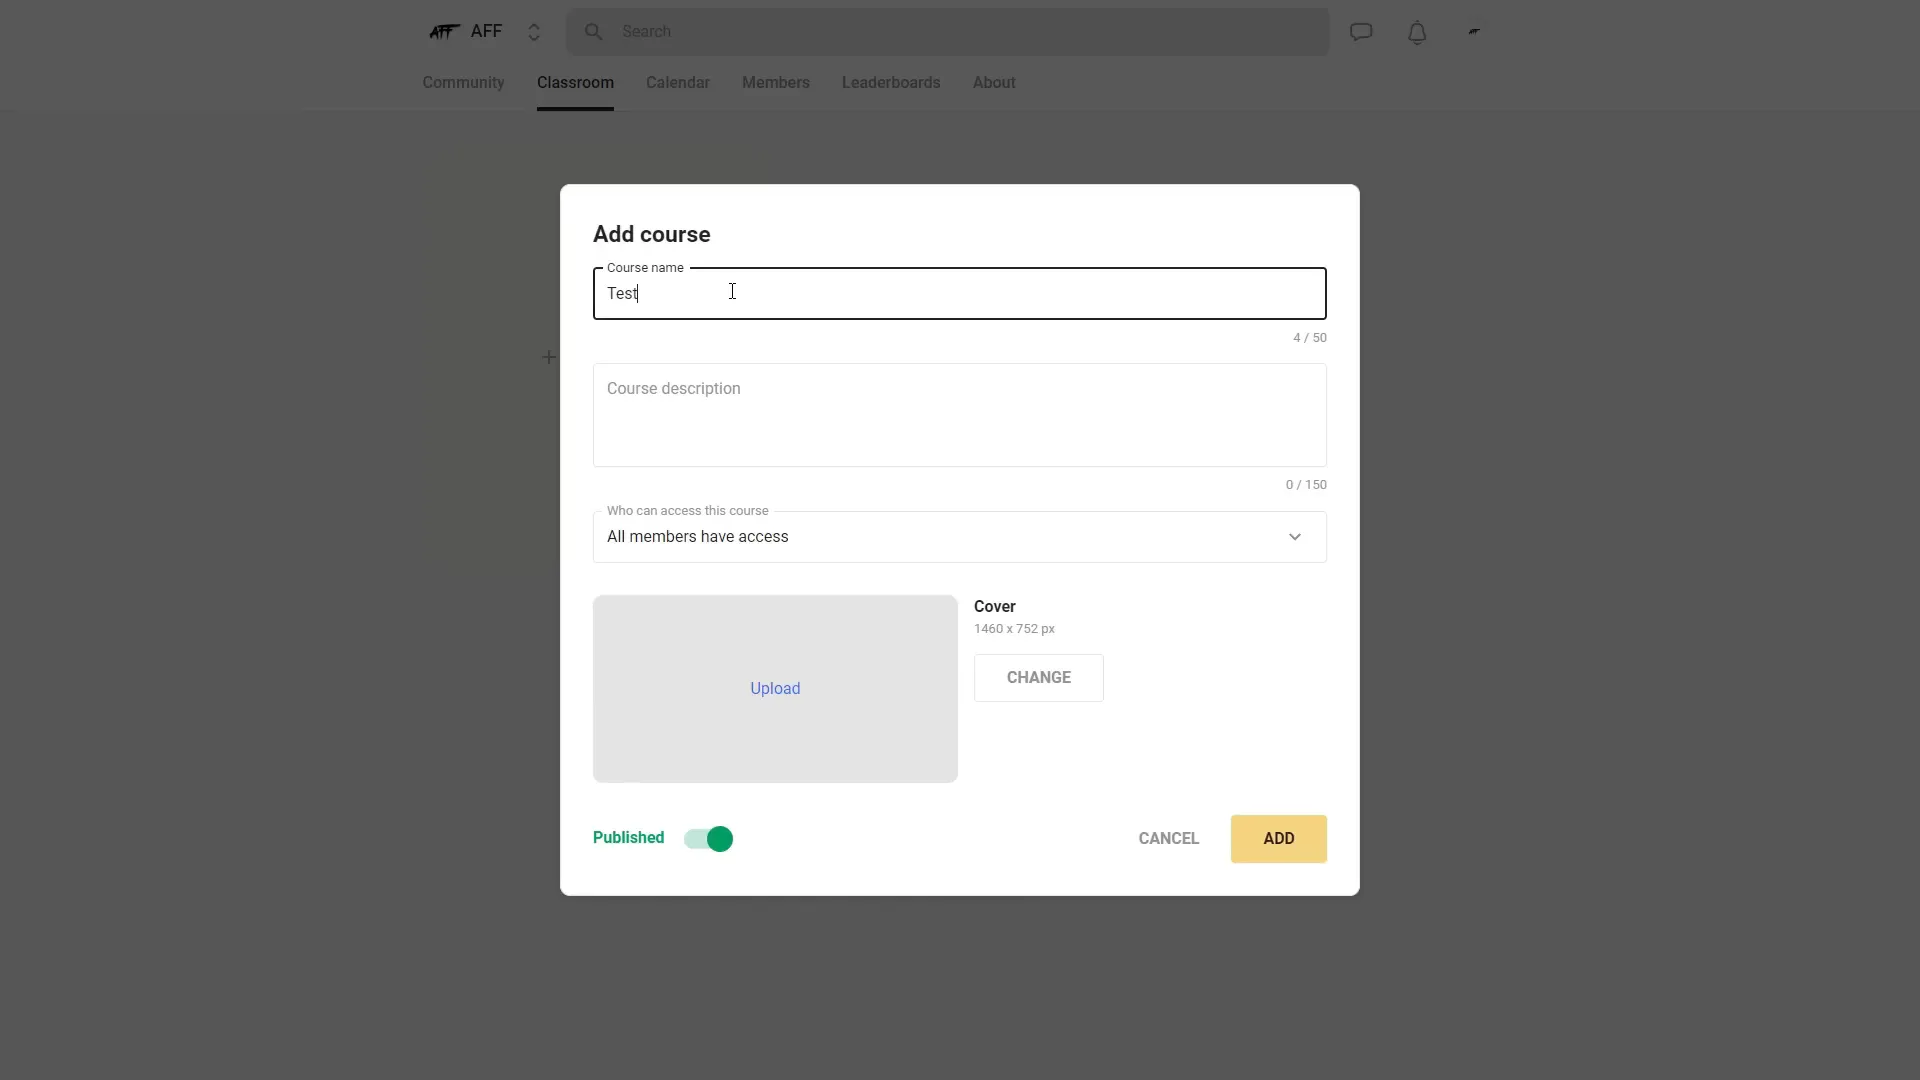
Step 11: Creating and Managing Courses in the Classroom Area
The Classroom area is where your Skool Account truly shines as an educational platform. Here, you can create detailed courses to educate and engage your members.
To create a course:
- Navigate to the Classroom Tab.
- Click New Course.
- Enter a course name and description.
- Set access permissions:
- All members can access
- Only members at a certain level (e.g., Level 5)
- Members enrolled in specific courses
- Upload a cover image for the course.
- Choose to publish immediately or keep the course as a draft.
- Click Add to create the course.
You can create unlimited courses, allowing you to build an extensive curriculum tailored to your community’s needs.
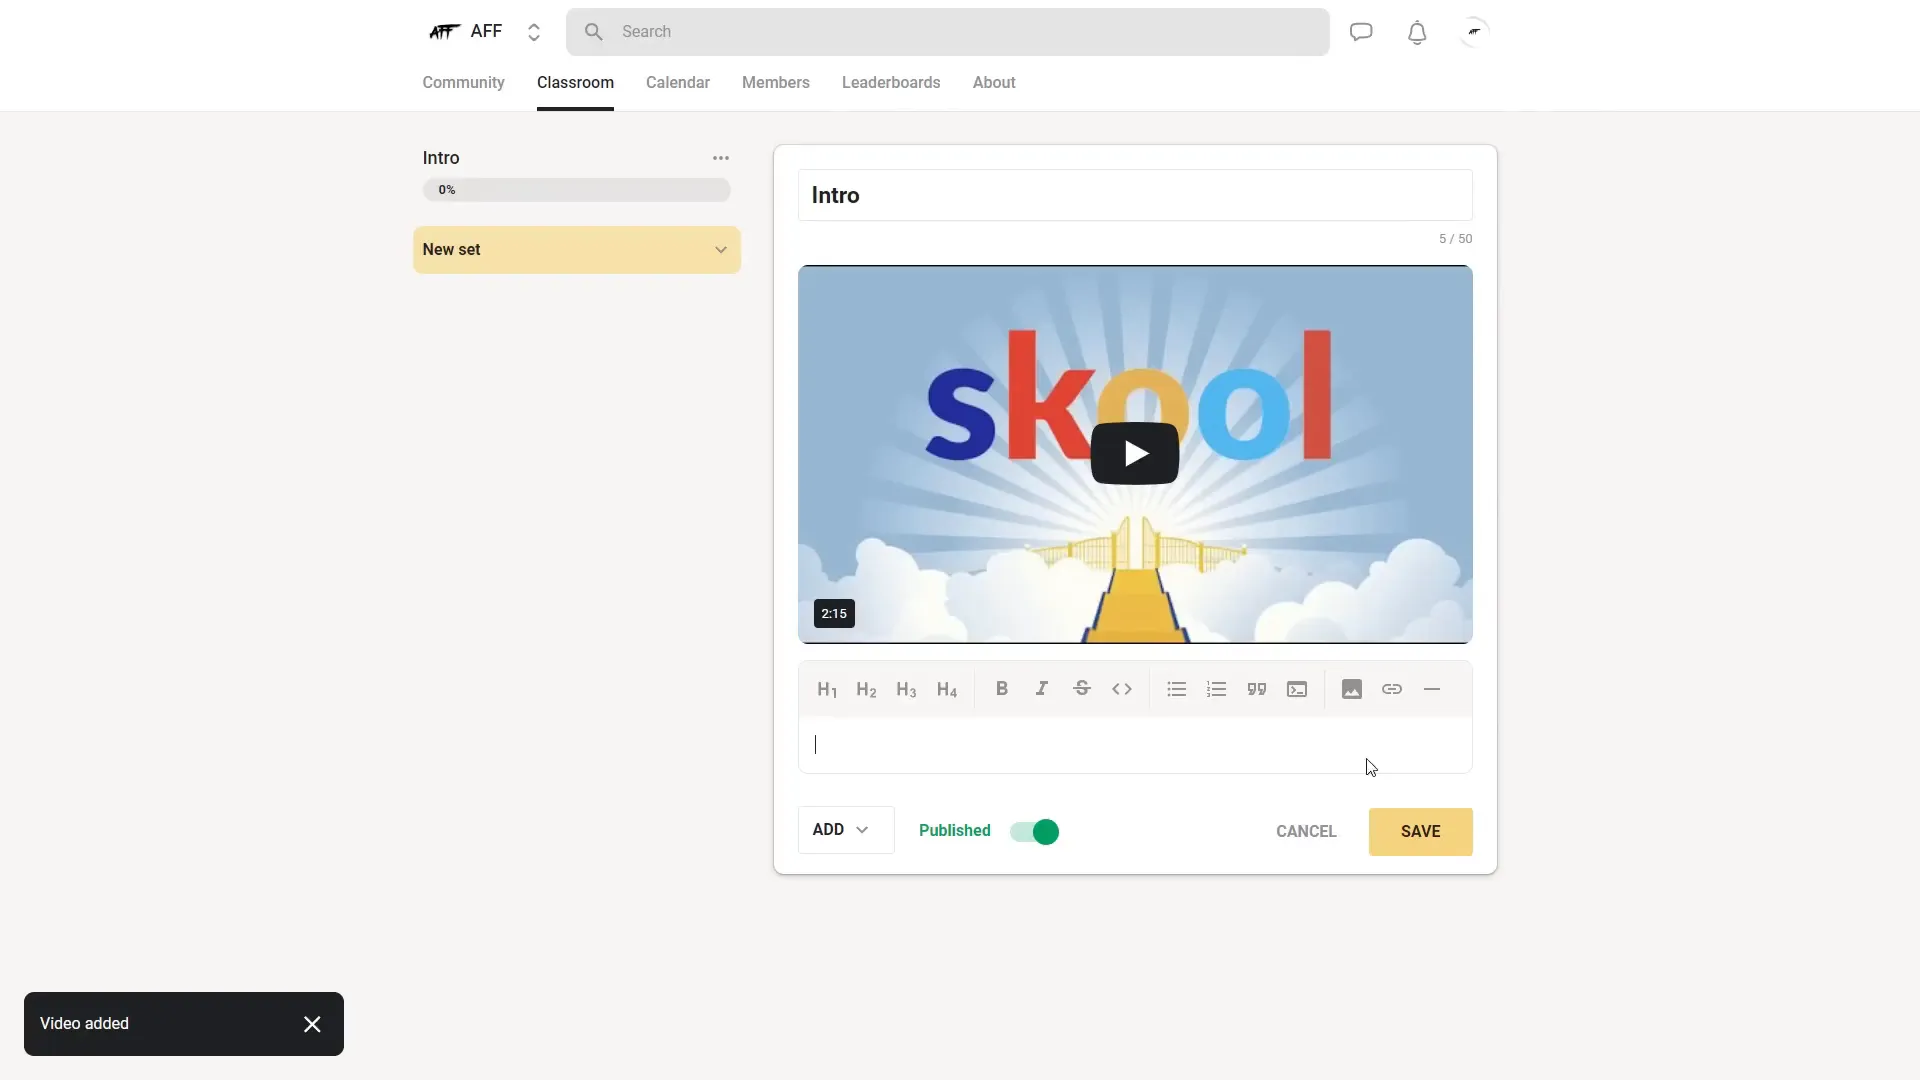
Step 12: Adding Modules and Content to Your Courses
Within each course, you organize content into modules or sets. These modules can include videos, descriptions, images, links, and downloadable files such as PDFs or transcripts.
To add a module:
- Open your course and click the pencil icon to edit.
- Set a title for the module (e.g., “Introduction”).
- Add a video by pasting a link from YouTube, Loom, Wistia, or other supported platforms.
- Add a description with formatting options like highlights, italics, or strikethrough.
- Insert images or links to supplement the video.
- Upload resource files or transcripts for members to download.
- Save the module.
You can add multiple modules to each course, delete or edit them as needed, creating a rich learning experience.
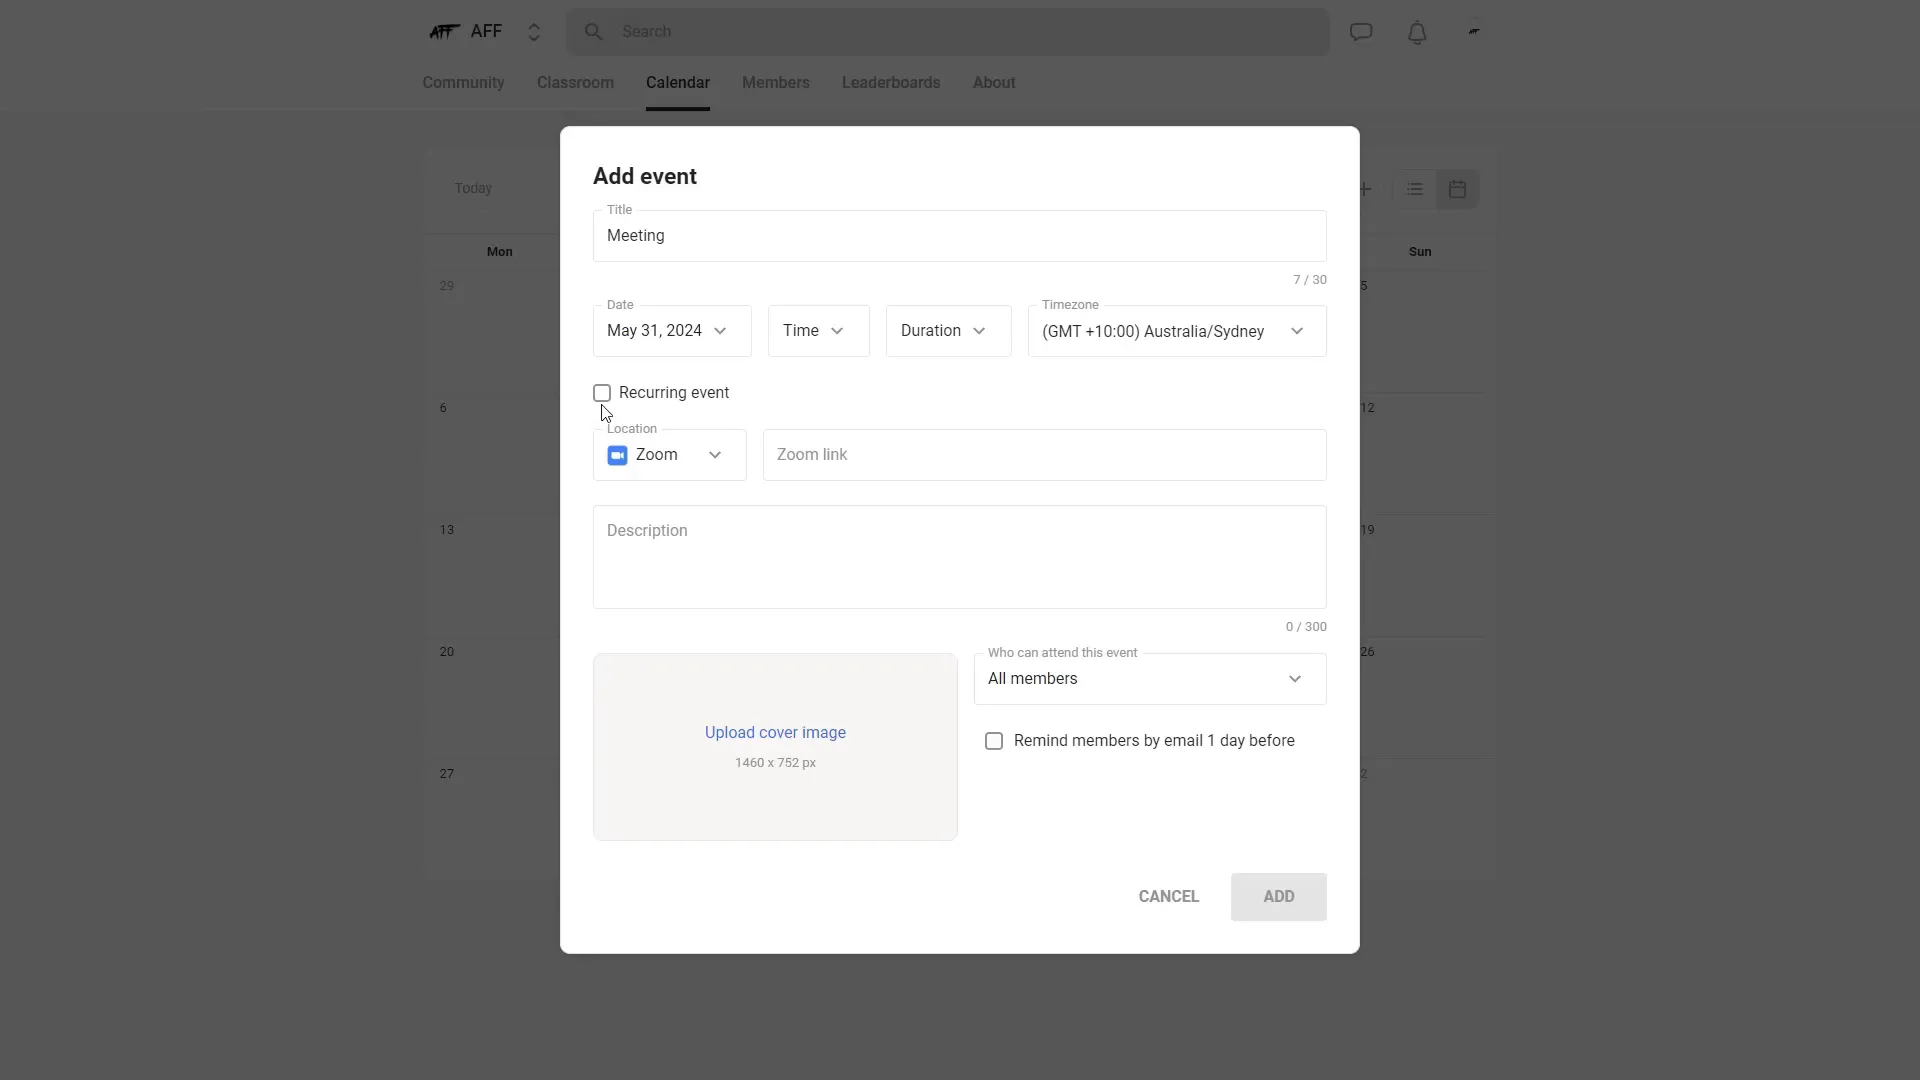
Step 13: Using the Calendar to Schedule Events
Skool’s calendar feature allows you to organize events such as meetings, webinars, or live sessions. Scheduling is simple and flexible:
- Go to the Calendar Tab.
- Click the plus (+) button to add a new event.
- Enter event details: title, date, start time, and duration.
- Select the time zone to accommodate members worldwide.
- Set recurrence if the event happens regularly (e.g., weekly every Wednesday).
- Add a meeting link (Zoom, Google Meet, or other).
- Provide a description and upload a cover image.
- Choose who can attend: all members, members at a certain level, or course participants.
- Opt to send email reminders one day before the event.
- Click Add to finalize the event.
Events will then appear on the calendar for your community to see and join.
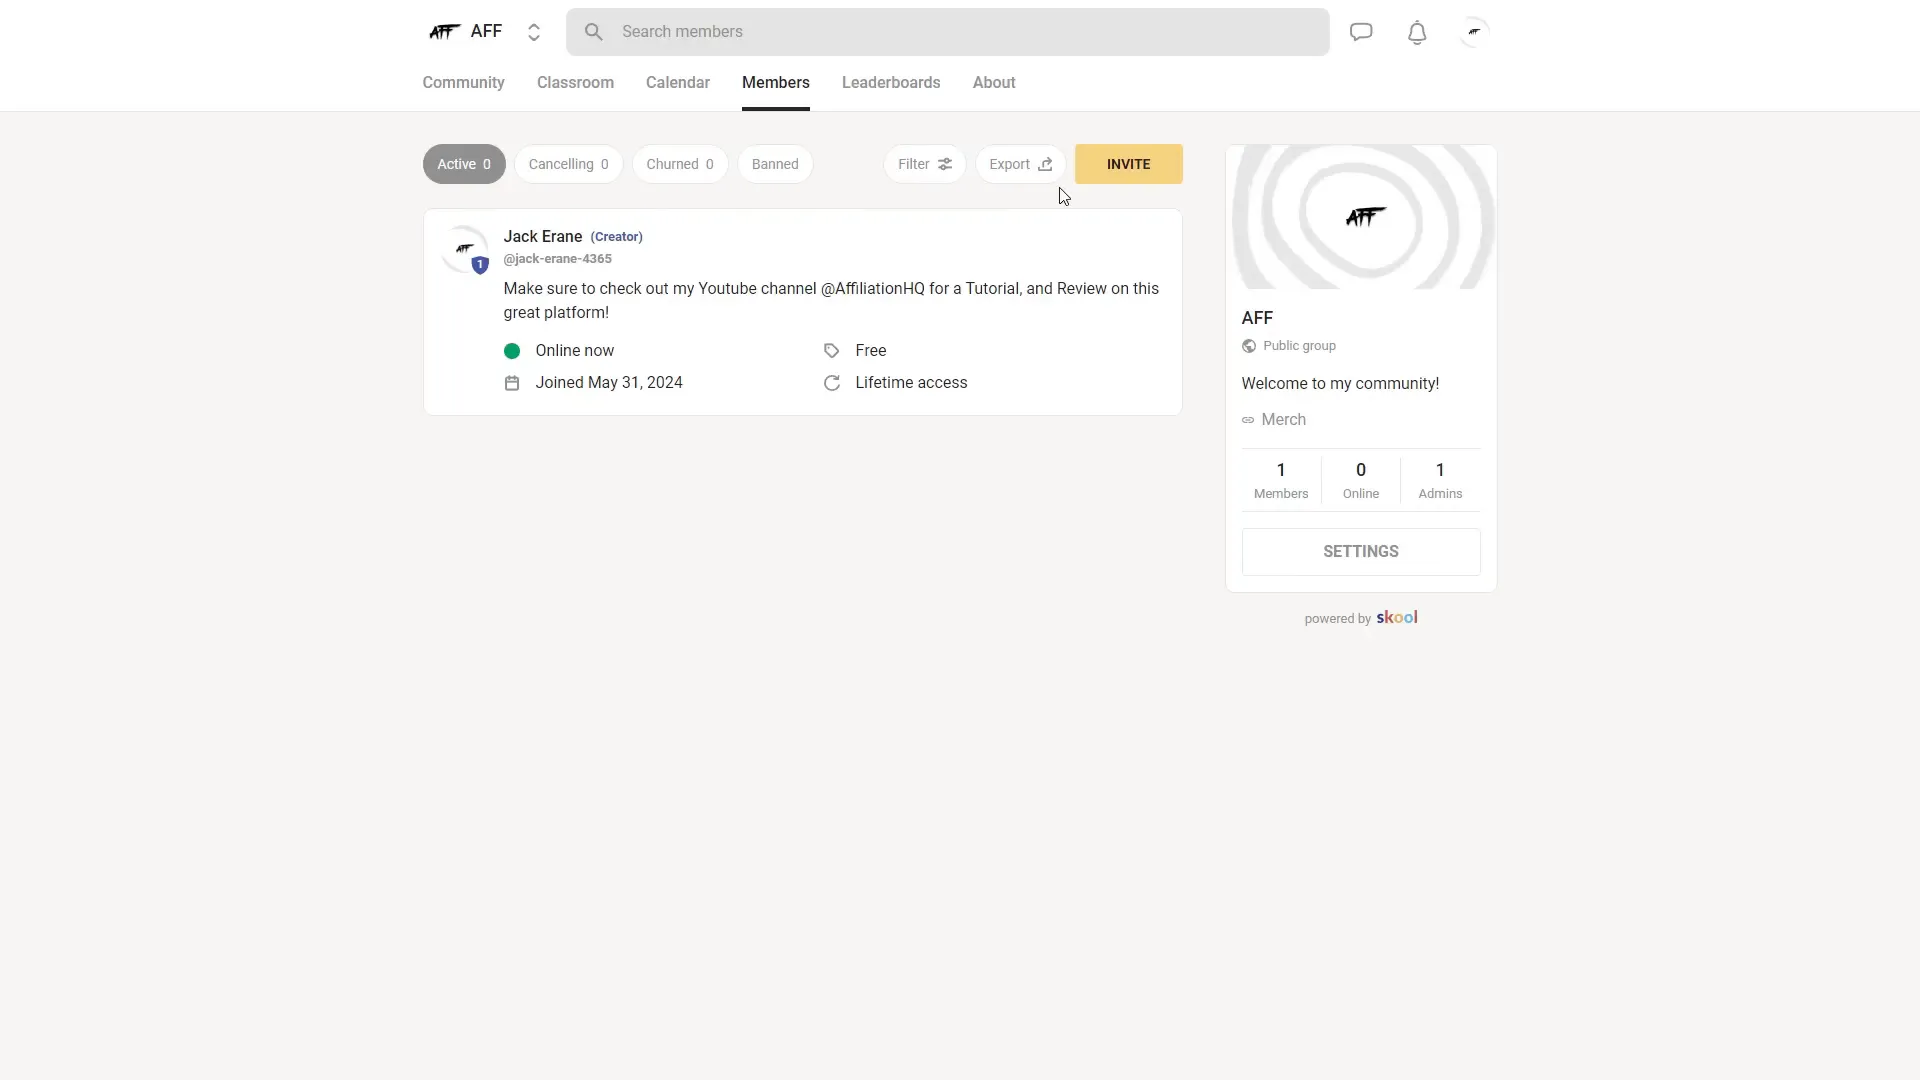
Step 14: Managing Members and Invitations
Keeping track of your community members is essential. The Members Tab provides an overview of everyone in your community, showing their online status, join date, and payment status.
You can also:
- Filter members by those who have canceled, churned, or been banned.
- Invite new members via a shareable link or direct email invitation.
- Control course access for invited members by selecting which courses they can join.
This makes managing your community simple and organized.
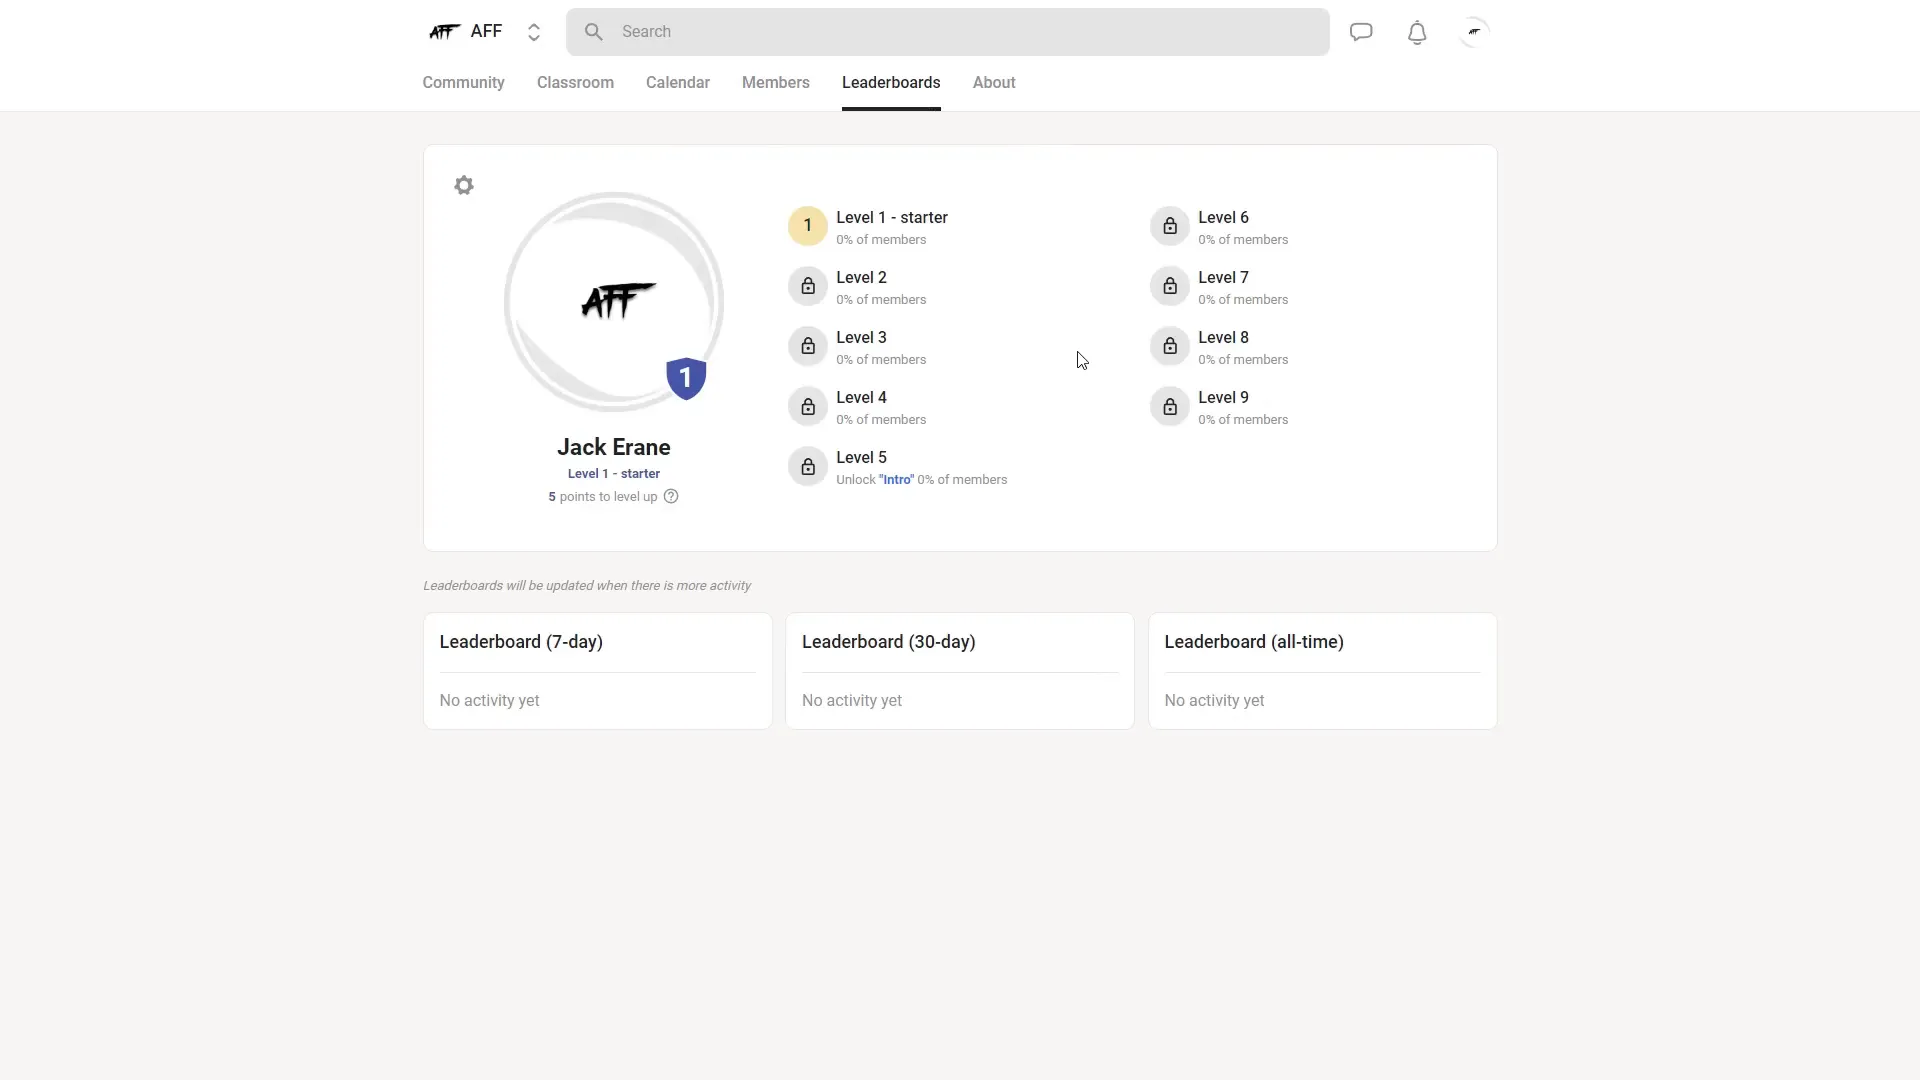
Step 15: Viewing Leaderboards and About Section
Leaderboards showcase the most active and engaged members in your community, displaying their levels and contributions. This feature encourages friendly competition and increased participation.
The About Section lets you upload a cover image and write a detailed description to explain the purpose and values of your community. This helps new members understand what your community is about at a glance.
Additional Tips and Features
At the top right of your Skool dashboard, you will find quick access to:
- Chat Area: Real-time messaging with community members (unlocked at Level 2).
- Notifications: Alerts for new posts, comments, or activities within your communities.
These tools keep you connected and responsive to your community’s needs.
Frequently Asked Questions (FAQ)
What is a Skool Account?
A Skool Account is your personal or professional login to Skool.com, a platform designed to build online communities, courses, and interactive learning spaces.
How much does Skool cost after the free trial?
After the 14-day free trial, Skool costs $99 per month. You can cancel anytime with no hidden fees.
Can I monetize my Skool community?
Yes, Skool allows you to charge a subscription fee for access to your community, making it easy to monetize your content and expertise.
How do I add courses to my Skool Account?
You can create unlimited courses within the Classroom tab by adding course details, setting access levels, and uploading content modules.
What is the purpose of gamification in Skool?
Gamification encourages community members to engage more by unlocking features, access, and badges as they reach higher activity levels.
Can I schedule events within Skool?
Yes, the Calendar feature lets you schedule meetings, webinars, or live sessions with options for recurring events and email reminders.
Is Skool suitable for private communities?
Absolutely. You can set your community to private so only approved members see the content and participate.
How do I prevent spam in my Skool community?
Skool uses a level system where chat and other privileges unlock after members contribute, reducing spam and encouraging meaningful engagement.
Conclusion
Building and managing an online community or course has never been easier thanks to Skool.com and its powerful platform features. With your new Skool Account, you have everything you need to create engaging posts, organize courses, monetize your content, and foster a thriving community.
Remember the key steps: set up your community identity, organize categories, leverage gamification, add courses and modules, and schedule events to keep your members connected. With these tools, you can create a dynamic and interactive learning environment that members love.
If you’re ready to take the next step, consider starting your own Skool community today and explore the platform with a 14-day free trial. Unlock the full potential of your online presence and build something truly impactful!
Happy community building!
Ready to Build Your Skool Community?
Start your 14-day free trial today and turn your expertise into a thriving, profitable community that members love.
Start Free Trial